Kitchen countertops can make or break a kitchen. They add value or take value away from a space. They can make you fall in love with a house! With so much power, you have to know how important they are.

But did you know that you can have outdoor kitchen countertops? It’s true! Outdoor kitchen countertops are placed in an outdoor cooking area, usually near a BBQ pit. But not all materials are suitable for an outdoor countertop.
Can You Use An Outdoor Countertop?
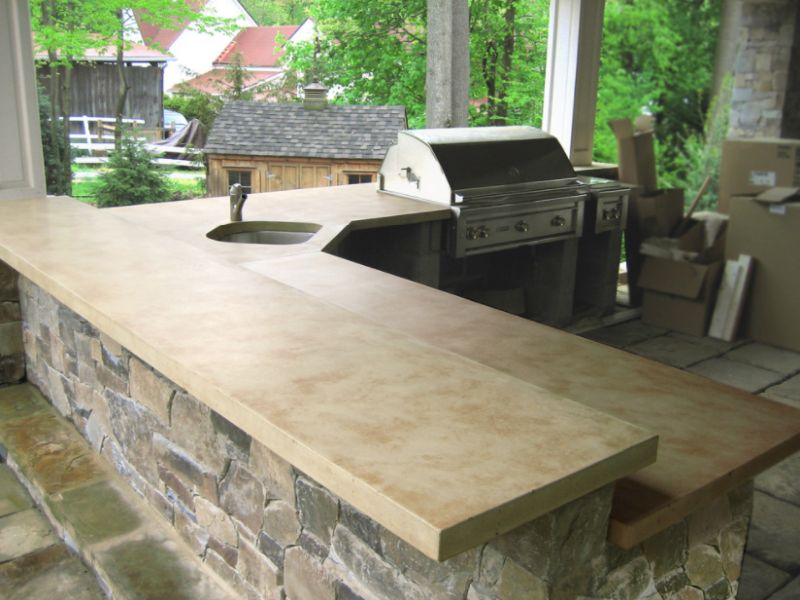
When you think of countertops, you imagine an indoor kitchen. But a lot of people have outdoor kitchen areas that they cook at. Getting an outdoor kitchen countertop sounds impossible but it can be as easy as getting an indoor one.
Outdoor kitchen countertops do require more work to begin with because they need to withstand the weather, pests, and so much more. But if you choose the right material, just about anything is possible.
Laminate
Laminate countertops are probably your cheapest option. However, they aren’t the best for outdoor use. This is because the particleboard underneath can’t handle the rain and may rot or mold in time.
Granite

Granite countertops will work outside, whether they are sealed or unsealed. This is because if they are sealed, they are protected. If they’re unsealed, then they can breathe and aren’t as prone to moisture setting in.
Wood
Outdoor wood countertops work fine. You will need to use wood that is safe to use outside, like the wood used for decks or outdoor furniture. But most importantly, you need to use an outdoor wood sealer that is safe to use around food.
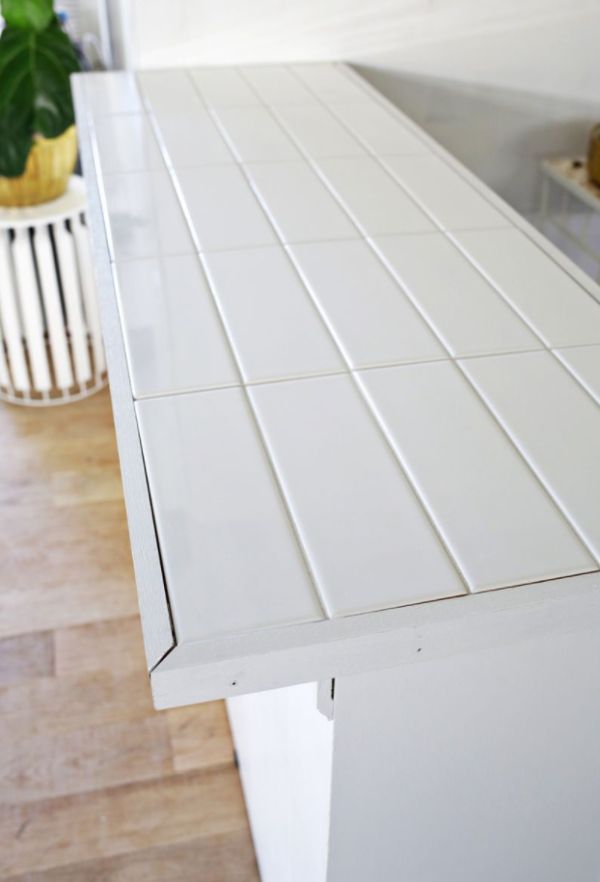
Tile

Tile is one of your best options because it is durable and waterproof. You can use it outside as long as you use an outdoor grout that will be protected from the rain and weather. There are so many options for tile too!
Soapstone
Soapstone is common in outdoor kitchens. Many times, outdoor fireplaces or pizza ovens use soapstone cladding. It is non-porous, heat-resistant, and looks natural in an outdoor setting. This is an awesome choice.
Metal
There are many different types of metal countertops. Steel and copper are two of the most popular. Copper with tarnish but steel will rust. But as long as you take care of the countertop, it should last a lifetime.
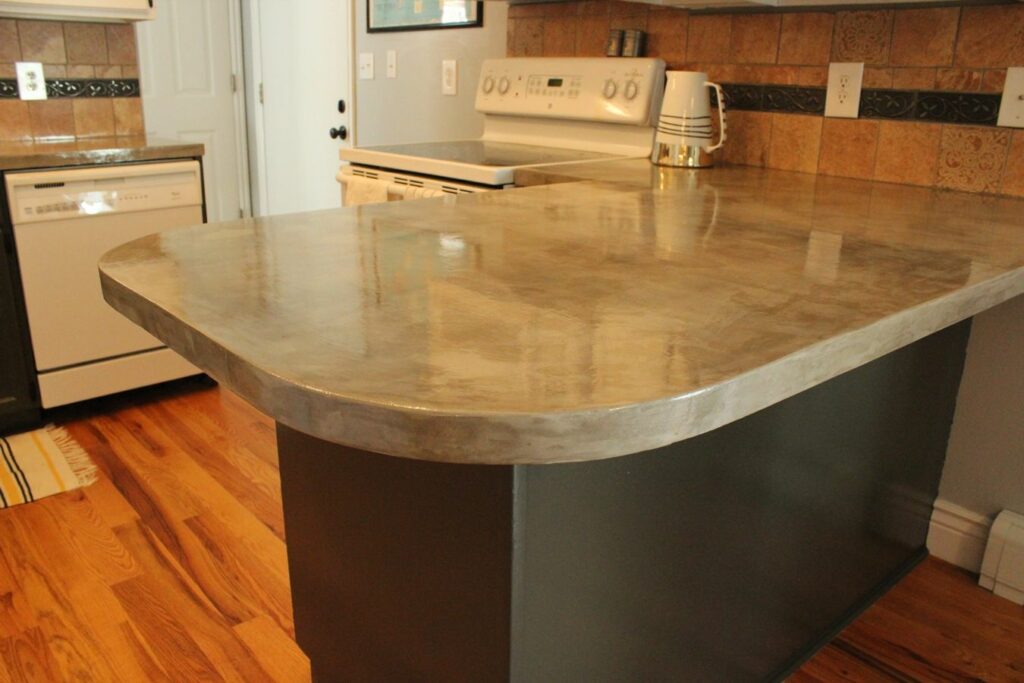
Concrete
We love concrete countertops, and they work just as well outdoors as they do indoors. Concrete countertops are simply wonderful and can be sealed to last a lifetime as well. Not to mention, they are fun to work with.
Stone
Although granite is also a stone, it isn’t the only one. You can use quartz, limestone, and marble for your outdoor countertops. Stone is used to being exposed to the elements, so of course, it is an easy win.
Building An Outdoor Tile Countertop

A tile countertop is one of your best options for outdoor use. You don’t even need any power tools to do so! All you need is a few simple tools that you can get for a few dollars if you don’t already have them.
Step 1: Lay Out Your Tiles

Obviously, you need to measure the countertop you want to build and get enough tiles to fill the space. You want to lay all of the tiles out and add spacers to them to create a proxy of sorts before you get to the real thing.
Make sure you measure at least twice to ensure everything is right. When you are sure that your tile will be the right fit, cut a backer board. Get a tile backer board and cut it to size, leaving a bit of room for mistakes.
Step 2: Cutting The Backerboard
To cut the backer board, you want to use a box cutter or drywall knife. Score it deeply then snap it off. It should snap easily. If it doesn’t, don’t force it or else you’ll end up with an uneven line to try to repair.
Once your backer board is scored and cut, you can get a piece of plywood that will be the base for the countertop. Make sure that the two are the same size and screw them together. The screws should go into the backer board.
Step 3: Lay Tiles

Use a trowel to add a thin layer of adhesive to your backer board. Only do a small area at a time, laying the tile in the area that you have added the adhesive to. Keep at it until the entire board is covered.
Make sure you add spacers and let the tile set for 24-hours. You are free for a day to work on another project because this is where it comes to a stand still.
Step 4: Add Grout

Use a rubber float to push the grout into the spaces between the tile. You want them to be full. You won’t move the tiles so make sure you fill the gaps or else there will be bubbles later on and the grout will crack.
After the grout has set for a few minutes, wipe the extra grout off of the tile. Do this again after the grout has dried even longer and then one more time after the grout has dried completely.
Note: Remember to remove the spacers before you begin grouting!
Step 5: Frame And Set
The next part is customizable, but it is preferable to add a small wood frame by using the proper wood joint cut. A miter cut works well. Screw them into the plywood from the side and then attach the countertop.
A great option is to use short wood screws to screw the counter in from below. Just make sure they won’t go through to the tile or the tile may crack. Plan the length carefully, taking the backer board into account.
Building An Outdoor Concrete Countertop

A really great option for an outdoor countertop is to use a base and cover it with concrete. Solid concrete countertops are amazing but you can get the same effect with this method as well. Just take a look!
Step 1: Clean Everything
Now, take your old countertop and clean it well. Make sure there is no dirt or grime on the countertop. If there are any bumps or anything, scrape it away and clean the countertop. Let it dry before working on it.
Step 2: Sand The Countertop

Now, using 60- or 80-grit sandpaper, sand the countertop. This is to rough up the countertop and give the concrete something to hold onto. It’s okay if it isn’t smooth. Just clean up afterward and let the counter dry.
Step 3: Mix Your Concrete

We used an Ardex Feather Finish with a 2:1 powder-to-water ratio to start. You want to start with small batches as well so that you use the right amount without making too much and while letting the layers become layers.
The concrete should stick to your putty knife and feel similar to peanut butter.
Step 4: Apply Concrete

Now, slowly, spread the concrete around your countertop. Work in small sections at a time, using your trowel to swipe it across, ensuring an even layer. Overlap slightly as you even out the concrete layer.
This takes experience to get right, but the end result should be the same. You want an even layer of concrete over the entire surface. Before moving onto another layer, you want to do the edge of the countertop.
Step 5: Clean Up

Yes, before you are even done. Run a paper towel or baby wipe along the edge of the counter while it is wet to clean it up a bit. Then, let the first layer dry before you move on. This should take about a day.
Step 6: Sand

Using your coarse sandpaper, sand the surface of your dried concrete layer smoothly. Sand it all well and then dust it off, vacuum it, and sort of mop it up. You want to be careful when smoothing the edges as you don’t want to over-sand.
Step 7: Repeat Steps 3-7
Now, you want to repeat the previous steps until you feel that the concrete is thick enough. This is usually around three, but it can vary. After you finish, you can sand it with 220-grit paper to give a very smooth finish.
Step 8: Seal Counter

Now, we recommend two sealants that serve two different purposes. A 511 Impregnator Sealer serves to seal the concrete against moisture absorption and stains and goes on first. So we did that next.
You simply paint it on liberally and let it dry. This doesn’t take long. You only need to give it a few minutes before getting rid of the excess. This will dry lighter than it applies so don’t worry about discoloration.
Step 9: Apply Second Sealer
After a day, you can apply another coat and give a strong seal. We used Safecoat Acrylacq which looks more polished while still adding more protection. Use it last for a shimmer and shine on your concrete.
You want to wait at least three days before actually using the countertop. This should be very safe to use outdoors because it is made of concrete and has at least three coats of sealants which will protect it well!
The post DIY Outdoor Kitchen Countertop Options appeared first on Home Decorating Trends - Homedit.


0 Commentaires