Pumpkin season is here once more and this means it’s time to start having fun. Carving pumpkins is an activity everyone can enjoy, regardless of their age. Kids and adults alike can use their creativity and come up with pumpkin carving designs that will create fall feels and add some fun into your home or front porch décor.

We have some great ideas for carving pumpkins but whole you’re picking out your favorite projects, we have some helpful information that will make your carving experience easier and more special.
What is the tradition behind carving pumpkins?

Surprisingly, the tradition of carving pumpkins on Halloween was brought to America by immigrants from Ireland where the original jack-o’-lanterns were actually made from big turnips and potatoes.
According to History.com, the root of this tradition is in the centuries-old Irish folktale about Stingy Jack, who tricked the devil but also was not allowed into heaven. When he died, he was doomed to roam the earth with burning coal to light his way, which Jack put into a hollowed-out turnip. They called him “Jack of the Lantern,” from where the current name comes. In the United States, the larger pumpkins – native to the country – make an even better vessel for Jack’s burning coal
When should you start carving pumpkins?
With fall décor showing up on front porches earlier and earlier, it’s no wonder that you might want to carve your pumpkin early in October so that you have a festive look for a few weeks. Don’t.
Although some sources say that you can carve a pumpkin a week or more before Halloween, the gourd actually starts deteriorating when you cut it open and carve it. To have a nice-looking jack-o-lantern on Halloween night, don’t carve your masterpiece any earlier than 5 days before. Three days might be best, especially if the weather is warm.
How long after carving does a pumpkin rot?
Once you cut open and carve your pumpkin, the breakdown process begins. Pumpkins are just like any other fruit: Cut them open and oxygen starts to do its job, wilting and rotting the flesh. How fast that happens depends on a number of factors, but generally, they only look good for about three to five days, which is why you shouldn’t carve them too early.
- Warm weather speeds up the rotting process.
- Even dry weather can affect a cut pumpkin and cause wilting.
- Once cut, the pumpkin can attract insects, which can also hasten your squash’s demise.
- Creatures like squirrels love a good pumpkin, so don’t be shocked if you find your masterpiece has been munched.
Can I make my pumpkin last longer?
As the saying goes – nothing lasts forever and the break-down of your Halloween jack-o-lantern is unavoidable. According to Maniac Pumpkin Carvers, there are a number of things you can do to keep it looking fresher and delay the inevitable rot:
- Cut a hole in the back and not the top. Leaving the stem intact can help delay rotting and wilting.
- Wrap it up. Instead of leaving it on the front step all the time, when it’s not lit or on display, wrap it snugly with plastic wrap and put it in a cool spot – the refrigerator is great.
- Spray the carved pumpkin. Another way to slow down the rot and mold growth is to spray your pumpkin with diluted lemon juice or vinegar.
- Soak it. If you notice your squash starting to look a little sad, soak it in ice water with a tablespoon or two of bleach. This can give it a few more days of good-looking carved glory.
- Seal the edges. Other sources say that a low-maintenance route to couple more days is to smear some petroleum jelly on all the cut surfaces to prevent them from drying out.

Can you eat a pumpkin for carving?
Once you’ve carved a pumpkin and let it sit on the stoop for a few days, the only future it has is the compost pile. If it’s uncut, however, you can certainly use the flesh for all kinds of culinary adventures. Just keep a few things in mind.
- Pumpkins sold for carving have a thinner skin and wall that makes them easier to cut. This also means the flesh is usually watery, stringier and more fibrous. Technically you can eat them but because they are not bred for flavor, they can be tasteless.
- Pumpkin varieties for cooking tend to be smaller in size and may be labeled with a varietal name. Sugar pie pumpkins are common as are some that are called cheese pumpkins.
- If you’re searching for a pumpkin for cooking, look for the small ones sold in the produce department of the grocery store instead of the big ones piled outdoors that are intended for carving and decoration. Local farm stands and markets are also a good source for these types.
How long will an uncut pumpkin last?
Kept in a cool dry place, uncut pumpkins can last a long time. According to experts at the University of Illinois, you can store them for 3 to 6 months if the temperature is around 45 to 50 degrees. For optimum storage, follow these tips:
- Choose pumpkins with at least 3 to 4 inches of the stem still intact. Those that have not stem don’t keep well.
- Make sure the pumpkin is not cut or bruised and has no soft spots, cracks or blemishes.
- Don’t store uncut pumpkins in the refrigerator because the environment inside the. Fridge is too moist.
- Some people also wash the uncut pumpkin in a very dilute bleach solution to kill any mold or bad microbes.
What should I carve in my pumpkin?
After picking your prized pumpkin, deciding what to carve in it is your most important decision. While there is an endless array of cool ideas for carving your pumpkin, the main question is how much time and effort you want to devote to the project.
If you are carving a pumpkin with children…
If you are carving your pumpkin with children, choose simple designs that they can help with and that won’t take too long.
If you’re a novice…
Even as a beginner, there are plenty of unique designs that are a little more complex than the basic jack-o-lantern face. These can be a lot of fun. Another option is to carve pumpkin luminaries, which can feature very simple carving but have plenty of drama.
Can small pumpkins be carved?
Yes, they can! Small or mini-pumpkins are so cute and make a fabulous display when multiples are used in a grouping. That said, carving small pumpkins can be a bit more dangerous because of the small size and the fact that you need to use an Exacto knife to do the cutting.

According to the Mini Gardener, before you start carving small pumpkins, consider these points:
- This is definitely not a project for children.
- Although the carving process is similar, cutting takes extra care.
- Wear a protective leather glove on the hand holding the mini-pumpkin and brace it against your body or a surface.
- You’ll need to trace and cut a hole in the bottom of the pumpkin to accommodate a tealight.
- It’s best to use battery-operated tealights in small pumpkins.
How do you carve a pumpkin easily?

It’s time to carve your pumpkin! While this is definitely a fun process, you also want it to be as easy as possible, no matter what type of design you are making.
Here are the basic steps to follow so that you can carve a pumpkin easily.
- Take a clean, dry pumpkin and place it on your work surface.
- Using a pencil or pen, mark the place where you will cut off the top.
- Turn the pumpkin sideways and use a very sharp knife – and a lot of caution – to slice off the top. Set the top aside for later and turn the pumpkin upright.
- Take a smaller sharp knife and cut around the inside to remove the top disk of flesh.
- Use a spoon to scoop out all of the seeds and stringy pulp from the inside.
- If you have a thick-walled pumpkin, you can use the spoon to scrape away additional flesh from the inside in the area where you will be doing the carving.
- Next, use a pen or pencil to mark your design on the outside.
- Use a sharp knife to cut out your design. Another option is to use a carving tool kit that includes a poker to pierce the design into the pumpkin and a variety of little saws for cutting. (The kit is a safer option for children and allows them to do more of the work.)
- Pop out the pieces you have carved, and wipe off the front of the pumpkin, rubbing out any stray pen or pencil marks.
- Use a tealight, candle or battery operated light to illuminate the pumpkin, put the top back on and display!
- To make your masterpiece last longer, follow the tips we laid out above for prolonging the life of your carved pumpkin.
How do you carve a simple pumpkin face?

Carving a simple pumpkin face is an easy project and should not take too long to do.
- Take a clean, dry pumpkin and place it on your work surface.
- Using a pencil or pen, mark the line all the way around the pumpkin where you will cut off the top.
- Carefully cut out the top of the pumpkin and set it aside for later.
- Use a spoon to scoop out all of the seeds and stringy pulp from the inside.
- With a pen or pencil, mark the basic face design on the outside of the pumpkin. The easiest design uses triangles for the eyes and nose. The mouth is a wide smile with a few teeth sticking up into the open mouth. If you have trouble with the mouth, an option is to cut it out of paper, tape it to the pumpkin and then trace the design.
- Cut out the eyes, nose and mouth using a small, sharp knife or a pumpkin carving kit.
- Put a candle or tealight inside and replace the top.
- Voila!
The Best Pumpkin Carving Templates
When it comes to jack-o-lanterns, they can convey many moods – goofy, funny, happy, scary or downright sinister. If you’re ready to venture beyond the basic pumpkin face of triangles, check out these 10 great pumpkin carving templates:
Looking at You!

Here’s an easy variation on the basic pumpkin face. By skewing the mouth a little and enlarging the eyes in comparison to the nose, it gives your pumpkin a whole different look. The real extra comes with the addition of eyeballs, which make it appear that the pumpkin is looking sideways.
Here’s a little tip for when you’re carving: Always start with the smallest parts and then move on to the largest. Also, if you accidentally slice off an eyeball protrusion (or a tooth) don’t worry! Just use a toothpick to anchor it back in!
Goofy

A great non-scary option for a pumpkin face is a goof expression like this one. A bigger grin with some teeth widely spaced makes the smile a little silly. Enlarging and rounding the eye space and moving the eyeballs to the bottom of make it even funnier.
Rounded curves can be a little more challenging to carve, but they’re really not that hard. If the first cuts aren’t rounded enough – and they very well might not be — you can always go back and shave off a little more to smooth out the curve.
Cheeky Jack

Cheeky Jack looks like he’ll be the troublemaker at your Halloween party! The design template is super easy precisely because every feature of the face is irregular and misaligned. These attributes make it a great choice for beginning carvers or those who want a quick, easy and forgiving pumpkin face pattern.
Worried Jack

Still looking a little goofy, the Worried Jack pumpkin carving template is not the most basic but is still pretty easy to carve. The rounded eyes are large and while the mouth is thin, it’s made up of straight lines and angles. Even better, it does not have to be symmetrical so it’s a very forgiving design.
Franken Jack

This pumpkin face pattern is a little scary but won’t give the neighborhood. Kids nightmares. It’s a fun take on Frankenstein’s big angular teeth and the square eyes and nose remind you of the blocks on sides of the original character’s head. By the way, if you save the cubes from eye cutouts, you can attach them to the sides for even more authenticity!
One Eyed Jack

Here’s another one that is a bit scary but not too much. A little reminiscent of a kids movie character, this pumpkin carving template is easy because it really only has to cut-out areas and they are pretty big. On the difficulty scale, this pattern gets two out of five knives, likely because of the little eyelashes. Otherwise, it’s a super simple design with curves that can easily be rounded out with a little shaving after the initial cuts.
Hmm…Jack

A little further up the scary scale is this pumpkin carving template. It seems a bit scary but maybe not. The angular eyes give it a bit of spookiness but the silly mouth keeps it from being too much. This type of pumpkin face pattern is forgiving because nothing has to be completely symmetrical, so if you’re a little off on the design, it only adds to the charm.
Watch Out

This is a variation on the Hmmm Jack pattern but it is a touch scarier because of the angle of the eyes and the added teeth in the smile. It’s still an easy pumpkin carving template because the design is a variation on the traditional triangular shapes used for a jack-o-lantern face. The eyeballs are also not as round and symmetrical, making them easier to carve.
Scary Jack

True to his name, this jack-o-lantern is very scary. Super narrow and angular eyes – and eyebrows — give him a sinister look. The feeling is emphasized by the mouthful of very big and scary teeth. This pumpkin carving template rate a two out of five on difficulty and that is probably because the thin lines of the teeth can be challenging. The other cuts in this design are rather straight and not too complicated.
Jack Nightmare

If you’re looking for more of a pumpkin-carving challenge or if you already have some serious carving skills, Jack Nightmare is for you. Not the most difficult, but pretty close, this pumpkin pattern is reminiscent of a famous Tim Burton movie character and may or may not be scary, depending on your knowledge of the film.
The eyes are distinctively shaped but not terribly difficult to do. The real challenge comes in the thin, stitched mouth and all those tiny lines. You’ll want to have more carving tools handy for this pattern, not just a regular paring knife.
What are the best pumpkin carving tools?
Obviously, it’s possible to carve pumpkins with kitchen knives like a chef’s knife and a paring knife. It is far easier, however, when you use specialized pumpkin carving tools designed specifically for this job. These sets typically include small serrated saw-like tools, along with a pumpkin drill, scooper and other miscellaneous tools for specialty carving.
These are available in a wide range of prices, from affordable family-oriented kits to professional-level sets. Here are some of the best pumpkin carving tools to consider:
Halloween Pumpkin Carving Kit

While this Halloween Pumpkin Carving Kit is called a professional tool kit, its affordability and easy-to-use tools make it great for kids as well as adults. The 13 pieces in this set include six carving knives that have a double-headed design and all the cutters have high-quality stainless steel heads and sturdy plastic or wood handles. All the tools fit in a handy storage case to keep them stashed safely.
Happy buyers say that the tools are sharp and the kit gives you good bang for your buck. They note that this is better than what you can buy in a local store and that the case makes it easy to safely store the tools for use next year. Users reported that they could carve multiple pumpkins and the tools held up well without breaking, which is a common occurrence with many bargain pumpkin carving tool sets.
Heavy Duty Pumpkin Carving Kit Tools Halloween

With 95 percent four- and five-star ratings, this CHRYZTAL 13PCS Professional Heavy Duty Carving Set is a winner at an affordable price. The set includes five heavy duty stainless steel carving tools — an etching tool, pumpkin drill, double-sided saw, pumpkin scooper and small saw. It also has eight double-sided detail sculpting tools that help you create realistic 3D facial details. All the pieces fit into a zippered storage case.
Reviewers praise this kit for making carving easier and more convenient than when using a knife or very cheap carving set. Users say it’s easy to make awesome designs with all the specialized contouring and carving accessories.
Stickit Graphix Pumpkin Carving Kit

A little more basic but perfect for family pumpkin carving, the Stickit Graphix Pumpkin Carving Kit has everything you need to easily carve your masterpieces. The nine-piece set is heavy-duty with an ergonomic design and includes a pumpkin scoop, three different shapes of saws, and five professional carving tools. The rubber handles are eco-friendly and have no odor. The zippered case is great for storage so you can use them again next year.
These tools make carving a really fun project because they work so well, according to happy buyers. They also note that the tools are easy to hold securely and are much nicer than anything you can buy in a store.
Dremel Lite 7760 N/10 4V Li-Ion Cordless Rotary Tool

If you really want to make it easy – or get fancy with your design — a Dremel rotary tool is a fabulous option. This Dremel Lite 7760 N/10 4V Li-Ion Cordless Rotary Tool is a multipurpose rotary tool that you’ll find lots of uses for ii including pumpkin carving. The accessories are easy.
Quick accessory changes – With the patented EZ twist nose cap, accessory changes are easy and don’t need a wrench. It’s lightweight and charging is easy too.
When it comes to pumpkin carving, the Dremel can ramp up your carving game significantly. Users say that it’s easy to carve out varying depths for super detailed designs and make quick work of any shapes you want to cut. There are all sorts of bits you can use but the high-speed cutting bits and mandrel are the most used. Dremel pumpkin carvers add that the tool kicks up a fine mist of pumpkin as you work, so it’s best used outdoors, in a garage or workshop. Besides pumpkin carving, you’ll likely find many uses for this tool year-round!
Best Easy Pumpkin Carving Ideas for This Halloween
1. Pumpkin Ice Bucket

You can learn how to carve a pumpkin gradually. Start with something simple like this pumpkin ice bucket. The project goes like this: first you find a beautiful pumpkin big enough to accommodate a bottle of wine or champagne. Then you get a knife and carve out a portion on one side. Scoop out the insides and put ice in.{found on everydaydishes}.
Related: Pumpkin Carving Kits, Designs and Cool Ideas For A Truly Special Halloween
2. Carve and Dye Mini Pumpkins

Once you’re confident enough with your pumpkin carving skills, you can try something a bit more complex such as the cute and colorful pumpkins featured on Cfabbridesign. To make them you need white mini pumpkins, food coloring, bowls, and a knife.
3. Make a Pumpkin Alarm Clock
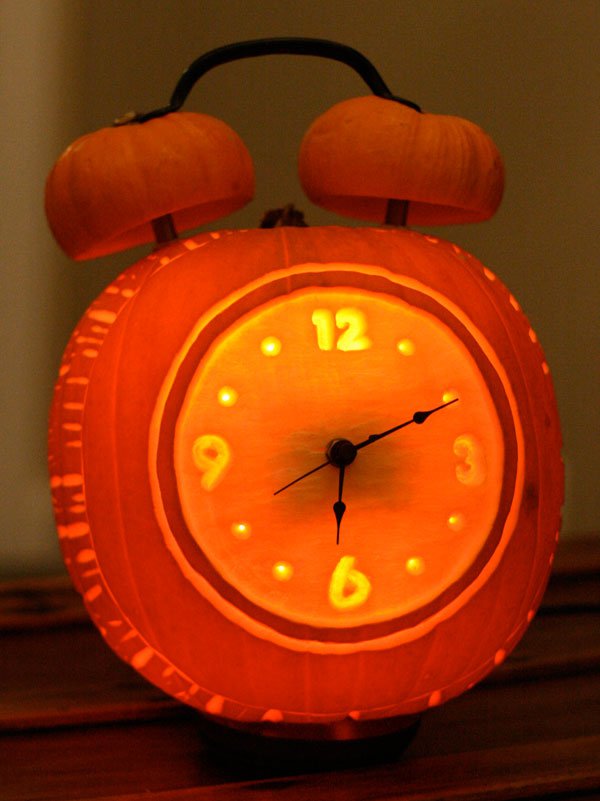
Wake up in the morning with a smile on your face. A pumpkin alarm clock would sure make things more fun and enjoyable. The project is quite easy. You just need the right pumpkin carving tools and you can find the whole list plus instructions on Built by kids blog.
4. Slice Up a Scary Mummy Pumpkin
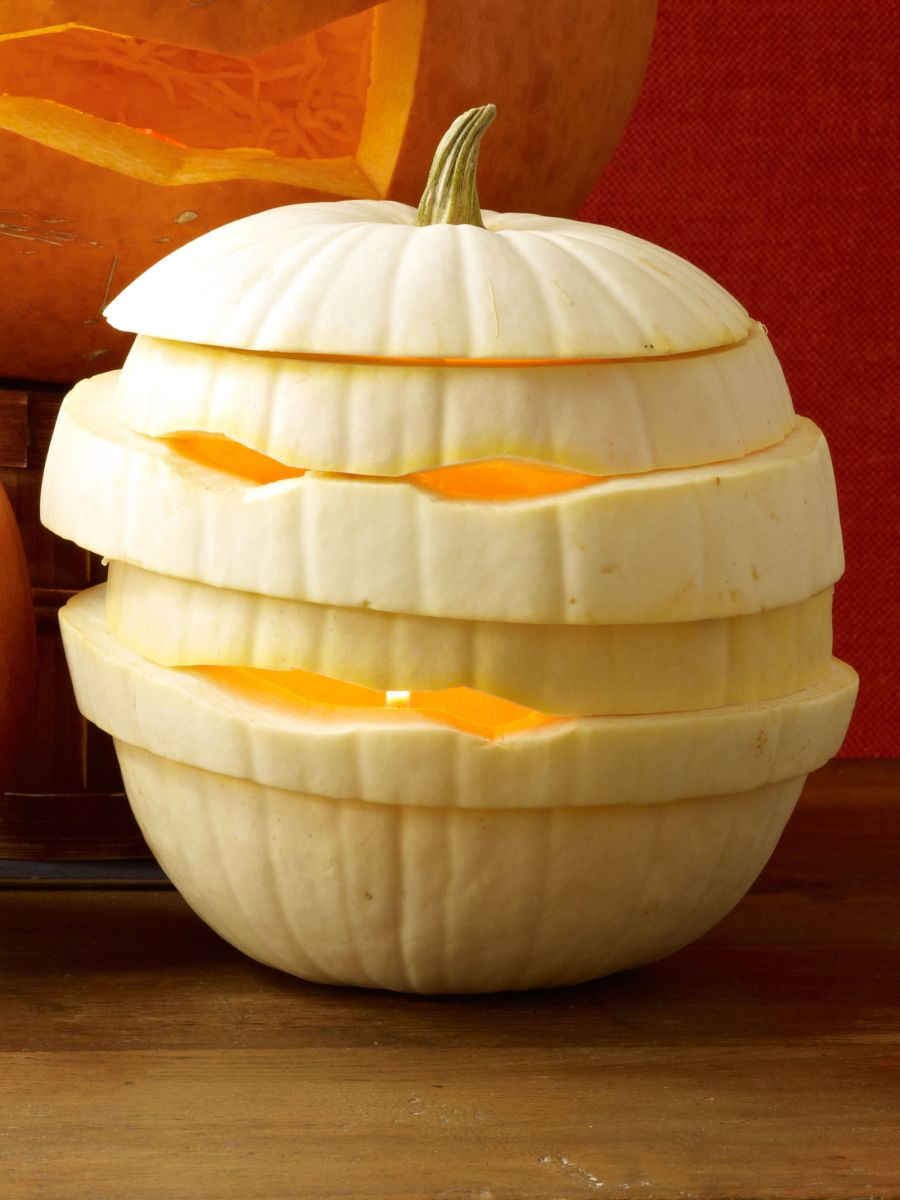
For decorative projects, there are tons of cool and interesting ideas you can use. For example, on Womansday you can find a quite lovely pumpkin that looks like a mummy. It definitely has a scary side as well but the most interesting part is the fact that the pumpkin was sliced and this gave it its signature look.
5. Keep It Simple With a Pattern

Using the right pumpkin carving tools is definitely important if you want to get the design right. On Remodelanolacasa you can find out how you can use the Sonicrafter F30 to carve out a feather pattern on your pumpkin. I have to say that the design is quite abstract but the lines are really clean and beautiful.
6. Use Pumpkin Stencils

Stencils can often make a lot of things a lot easier. For example, this can also be applied when carving a pumpkin. You can find all sorts of printable stencils which you can use in this way. A nice example is offered on Everydaydishes.
7. Create Party Pumpkins

Jack-o-lanterns don’t have to be scary if you don’t want them to be. You can carve out some happy faces and make them all cute and lovely. Unsure how that would turn out? Have a look at the cheerful designs featured on BHG.
8. Carve Your Pumpkin Using a Drill

Looking for easy pumpkin carving ideas that don’t require a lot of skill or a lot of time? An interesting suggestion we found on Everydaydishes was to use a drill. This way you can create a lot of chic designs and the process is easier than actually carving the pumpkin.
9. Design Easy Vampire Pumpkin Candle Holders

Those of you who want to add a scary touch to the carved pumpkins this year should have a look at the project featured on Freutcake. The vampire pumpkin candles are cute and scary at the same time and this contrast suits them really well.
10. Engrave Your Pumpkin

A design that allows you to add a bit of spark and style to a pumpkin involves using an engraving cutter, grinding stone, and a bunch of glitter. The idea was featured on Handmadeintheheartland and can be customized in a lot of different and interesting ways.
11. Draw On Your Pumpkin

Some projects are really easy while others require a bit more skill and creativity. An example of a project you can make with your kids, for example, can be found on Craftinomicon. The mini jack-o-lanterns are easy to make and you can let the kids draw the eyes, nose, and other details.
12. Cut Odd Shapes on Your Pumpkin

By cutting oddly-shaped slits into the surface of a pumpkin you can make it look like a mummy. We found this idea on BHG and we find it very interesting and definitely worth a try. If the pumpkin also has a greenish gray color it will look even better.
13. Make a Pumpkin With a Message

There are a lot of funny pumpkin carving ideas you can try. For example, great your guests with a funny message. The project is quite simple. The tricky part is making the cuts right. Also, finding the right message to display can prove to be challenging.
14. Try Themed Pumpkins
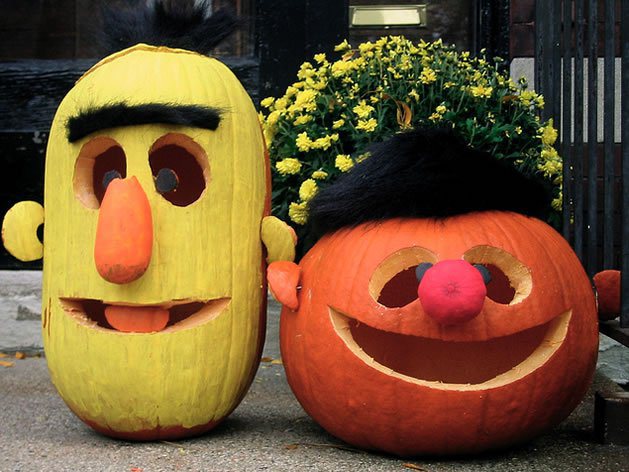
The inspiration for such a project can come from a lot of places. If you want to make something fun for the kids, take a look at the idea proposed on Makezine. These Ernie and Bert pumpkins will definitely be memorable for everyone who sees them.
15. Decorate Your Pumpkin With Objects

Give your pumpkin a funny face using things you already have such as an old pair of glasses and a carrot. The carrot can be the nose and the glasses will give it more character. You can also experiment will all sorts of other things and looks.
16. Go For Something Simple but Elegant

On the other hand, if you prefer something a bit more elegant, forget about all the funny faces and funky stencils and create your own unique pattern and design. Check out Invisibly for a little bit of inspiration.
17. Carve a Hat For Your Pumpkin
Of all the ways in which you can personalize a pumpkin, the designs featured on Ladyfaceblog are among the cutest. They suit the pumpkins really well and they offer a new perspective on the whole pumpkin carving process.
18. Give Your Pumpkin Monster Eyes

Even though the pumpkins featured on Marthasteward are supposed to look like monsters, they’re really cute and lovely. The googly eyes are a really nice and interesting touch. This project proves anything can look cute if you try hard enough.
19. Create Anatomy Pumpkins

Symbolism is important, especially on holidays such as Halloween. And since pumpkins are a must-have during that period, it’s always good to be prepared. Check out Brit for a few quirky and scary ideas on how to decorate the pumpkins this year with an anatomy-inspired theme.
20. Pumpkin Carving With Visual Effects

The visual effects created by the carved out designs on the pumpkin when creating a jack-o-lantern is the most important detail and the design we found on Instructables really knows how to emphasize this.
21. Drill Holes and Keep Your Pumpkin Abstract

Similarly, Thegardenglove shows you how you can use a drill to create abstract patterns on a pumpkin and how to combine several of them for a big visual impact. You can use this idea for your garden or entrance area.
22. Use Marshmallows to Give Your Pumpkin Teeth

A pumpkin with a sweet tooth can’t possibly look scary or creepy. Take that description literary and check out Craftymoods for instructions on how to incorporate delicious marshmallows in your project.
23. Design a Scene With Two or More Pumpkins
You can create interesting scenes using two or more pumpkins. They can interact in all sorts of funny, cute, romantic, or funky ways like the two featured on Womansday. Use those designs as inspiration or come up with your own unique idea.
24. Craft Braces For Your Pumpkin

To make a pumpkin look memorable, you have to make it stand out. For example, give it a funky haircut or braces on the teeth. Behance shows you how such a fun pumpkin craft design would look like. It definitely has a fun side and would look perfect sitting on top of a receptionist’s desk at an orthodontist’s office.
25. Consider Special Effects For Your Pumpkin

Idealhomegarden suggests using dry ice to make your scary carved pumpkin look even scarier. The idea is quite amazing. Use it as a starting point for projects that make your yard stand out this Halloween.
26. Carve Flowers in Your Pumpkin

In case you’re having trouble finding the right tool for pumpkin carving, Howaboutorange offers a bunch of suggestions related to this concept. The carving kit described here includes tools that allow you to create pretty much any kind of design you want.
27. Monogram Your Pumpkin

Monogrammed pumpkins are simple enough to be very versatile but also quirky enough to stand out in a lot of different settings. They’re also a lovely way of personalizing your home, garden, and yard without necessarily going out of your way to being unique.
28. Ensure You Have the Right Tools

Pumpkin carving can turn into a hobby if you’re really passionate about it. But for that, you need the right tools. Check out Thebluebrick for a few suggestions that can give your pumpkin an elegant and charming look. You’ll also find tips on how to perfect your carving technique.
29. Use a Hot Knife

An interesting idea suggests using a hot knife to carve a pumpkin. The result will be a design that features clean lines and which doesn’t require a lot of time or effort. Use this technique to create any type of design or pattern you want. {found on inmyownstyle}.
30. Don’t Carve Your Pumpkin All The Way Through
![]()
You don’t need to carve the pumpkin all the way through. It’s enough to expose a little bit of its fleshy surface and to create a pattern. Then, when you put the candle in and light it up, it will look really great. Experiment with different ideas and be creative. {found on witandwhistle}
31. Utilize Cookie Cutters as a Guide

Did you know you can use cookie cutters to create a one-of-a-kind carved pumpkin? We found about this on modernparentsmessykids. The idea is interesting because it leaves plenty of room for creativity. Also, you can let the kids help with this as well.
32. Go For a Peek a Boo Pumpkin

Pumpkin carving can take up a significant amount of your time, even if you are using a cookie cutter or stencil. When you want to save a few hours, but still want a cute pumpkin, you should consider making this peek a boo pumpkin featured on Princess Pinky Girl. Not only does it not require too many materials, but besides carving the top off, there is very little carving required to make this totally awesome pumpkin!
33. Paint Your Pumpkin

Don’t want the hassle or mess of having to clean out a pumpkin so you can carve it? Then this no-carve pumpkin project from The Spruce is the one for you. Instead of investing in a bunch of knives for cutting your pumpkin, grab some paints instead. You can use the paints to dip your pumpkins into different colors, or just paint a simple funny face on the surface.
34. Make a Mice Infested Pumpkin

Maybe you liked the idea of putting a simple pattern on your pumpkin this season but thought that it wouldn’t look very cool. Well, this next project from Martha Stewart is both an easy pumpkin carving idea as well as being super cute! Use a carving knife to cut holes of different sizes in your pumpkin, then head to the store and pick up some cute plastic mice, and voila! The cutest pumpkin on the block is on your porch!
35. Create a Franken Pumpkin

Finding pumpkin carving ideas that are easy but also quick to conquer can be difficult. So when you have a pumpkin carving contest that you just have to enter (but a limited amount of time to design) go for creating this Franken pumpkin from DIY Network. This pumpkin looks unique enough to win a prize, while also being an easy pumpkin carving design to conquer with a few hours’ time.
36. Batman Pumpkin

Do you (or your kids) love Batman? Well, a Batman themed carved pumpkin is actually not as difficult as you would think to make. You can easily print off a picture from the internet and tape it to your pumpkin to trace like a stencil. If you need some inspiration, you can look at these ideas found on Bat Blog. And don’t feel like you have to stop at Batman because you can use this idea for almost any superhero logo you desire!
37. Pumpkin Hamburger

This next pumpkin design from Princess Pinky Girl is super cute and easy to carve, but unfortunately, it will have to be for an indoor party rather than a decoration for your front porch. This is because you’re going to make your pumpkin look like a giant hamburger! All you have to do is get the proper hamburger supplies, cut your pumpkin in half, and glue the pumpkin seeds to the top! Pretty cool, huh?
38. Cookie Monster Pumpkin

For those who decided to make the Bert and Ernie Sesame Street pumpkins described above, you might notice that they seem a little lonely. If this is the case, then it may be time to bring their pal, Cookie Monster, to life in pumpkin form! And the best part is, you can also use this pumpkin as cookie décor at your next party! Find out how to make this easy pumpkin carving idea at Shared.
39. Trick or Treat Pumpkins

Not going to be in town this Halloween season? This may leave you wondering how you will get treats (or even tricks!) to all those kiddos! That’s where this next easy pumpkin carving idea from Unique Ideas comes in. All you have to do is carve the word “trick” or “treat” on your pumpkin then make a hole to place the treats (or the tricks!) into, and you are all set!
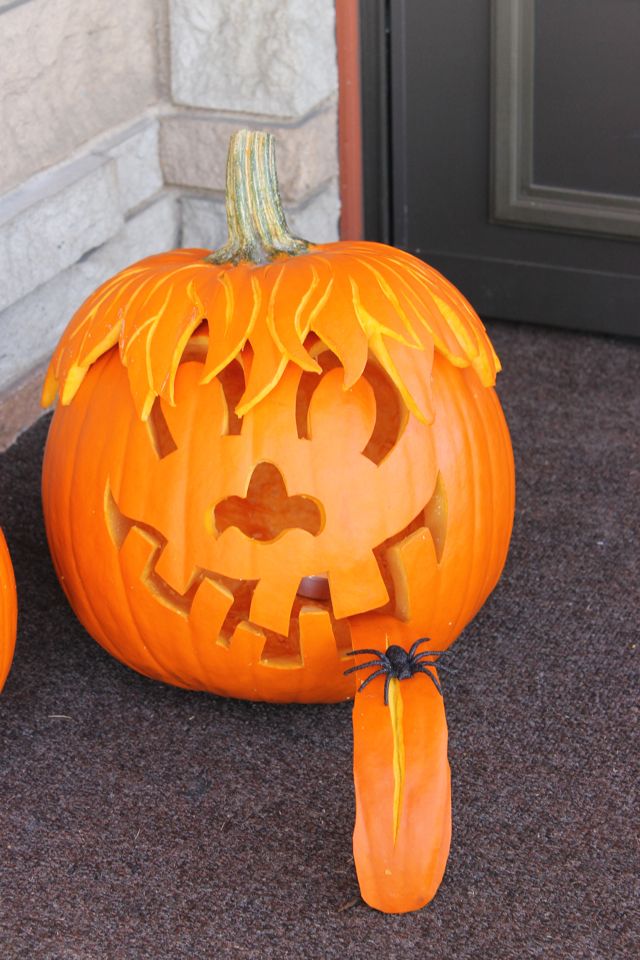
40. Carve a Pumpkin Within a Pumpkin

When you are looking to upgrade your pumpkin without having to spend hours practicing on your carving skills, consider placing a smaller pumpkin inside the mouth of your pumpkin. This is a cute and creepy idea that can really take your pumpkin to the next level without having to require hours of carving practice to get there! Find out how you can make this project a reality on DIY Network.
See some pumpkin carving ideas you can’t wait to get started on? Then don’t! Pumpkin season is already here, and carving one now means you’ll have time to carve another one later! No matter which easy pumpkin carving idea you decide to pursue, none of these ideas will take longer than an afternoon to complete. So grab that pumpkin carving knife and get to make a wonderful collection of pumpkins for your front porch!
FAQ
What is the tradition behind carving pumpkins?
Pumpkin carving originated in Ireland and centuries-old Irish folktale about Stingy Jack, who tricked the devil but also was not allowed into heaven. Doomed to roam the earth, he put a with a burning coal \ into a hollowed-out turnip to light his way.
When should you start carving pumpkins?
Carve your Halloween pumpkin three to five days before the holiday to ensure it looks good and isn’t rotting.
How long after carving does a pumpkin rot?
Although deterioration starts as soon as you cut it open, rotting generally begins after 5 days. How fast it occurs depends on a number of factors including the outdoor temperature and the presence of any insects or wildlife that might munch on it.
Can I make my pumpkin last longer?
There are a number of ways to eke a few more days of enjoyment out of a carved pumpkin ranging from putting petroleum jelly on the cut edges to wrapping in in plastic and storing it in a cool place when not lit and on display.
Can you eat a pumpkin for carving?
Technically, carving pumpkins are edible but they tend to be more fibrous and watery. If you’re looking for a pumpkin to cook with, choose the smaller varieties like the sugar pie pumpkin. It is not safe to eat a carved pumpkin that has been on display.
How long will an uncut pumpkin last?
Kept in a cool dry place, uncut pumpkins for 3 to 6 months if the temperature is around 45 to 50 degrees.
The post 40 Cool Pumpkin Carving Ideas You Should Try This Fall appeared first on Home Decorating Trends - Homedit.


0 Commentaires