If you are always trying to find ways to make your outdoor space better then you are not alone. This is a common thing that many homeowners are trying to do. Because outdoor space is meant to be enjoyed.
That’s why we have decided to tell you about a unique invention called the garage pergola. Don’t feel alone if you’ve never heard about a garage pergola before. These aren’t that common but they definitely should be!
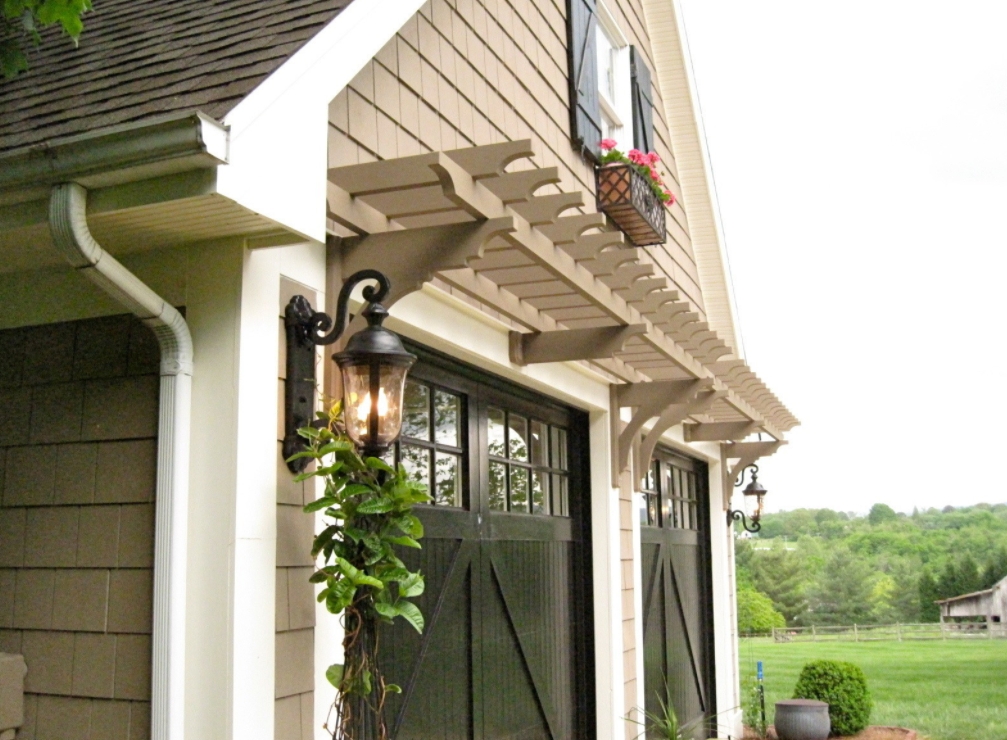
What Is A Garage Pergola?

A standard pergola is a structure with rafters and without a roof that stands in your yard for you to relax under. They are often used for gatherings and BBQs but can be used for any activity for you and your family.
A garage pergola differs because it is attached to the exterior of a garage. This type of pergola is more like an overhang or a canopy that extends just a few feet from your garage to shade the area beneath it.
Benefits Of A Garage Pergola

A garage pergola isn’t all that common so many people wonder why even build one in the first place. But the truth is that there are many reasons why a garage pergola can serve you well in your yard.
Weather-Protection
While it may not offer a lot of protection, a garage pergola can offer enough protection from the elements to be worth it. You can stand under it and likely be safer than if you are out in the open without it.
If you had a canopy or canvas on top of it then you are even more likely to enjoy its protection. Maybe even stand out under the small pergola in the rain, enjoying “almost” standing in the rain yet staying dry.
Added Shade
It may not add a lot of shade either but it is more than enough to stand under. If you are working outside and want a bit of relief then you can lean up against the garage door or siding and be under the pergola.
This is especially important recently with increasingly hot summers with heat indexes through the roof. Or pergola, in this case! Either way, it’s important to stay cool in summers as hot as we’ve been having.
Window Protection
A pergola can do wonders for your garage windows. Garage windows never seem to last, no matter how well you take care of them. But a garage pergola can help protect the widows quite well with just a little bit of cover.
If you really want to protect the windows better then another layer of protection by either adding a protective layer to the windows directly or adding another layer to the pergola. Just keep the windows safe!
Leave Garage Open
This may be the best part! If your garage is a space you love to hang out yet you are also an outdoor person, then a pergola might be the answer. You can get the best of both worlds by leaving the door open.
So if you are working, working out, or even playing games in the garage, you can open the garage door and enjoy the outdoors too. Make sure you keep a nice landscape full of greenery if you choose this route.
Aesthetics
Finally, the main reason people get a garage pergola is that they are just nice to have around. They add quite the curb appeal and always draw attention to the garage. So make sure you have a nice garage door to show off.
Garage pergolas are a lot like eyebrow windows or some other type of dormers in this sense. They attract a lot of attention. So get nice garage doors and a good security system to ensure this is always a good thing.
How To Build A Garage Pergola

Now it’s time to get down to a step-by-step tutorial on how to build a garage pergola. For this project, we designed the pergola to fit over a one-car garage. So it was meant to be 12ft wide by 28 inches deep by 29 inches tall.
For this, we purchased 2×4 boards for the rafters that were 12-feet long. Then we got 2×2 balusters for the purlins that were 28 inches long. We also made brackets to hold them up which you can build or purchase yourself.
Step 1: Mark Your First Board
Start by getting one of your 2×4 rafters to work on. You want to mark a location at 1 and 4 inches from the end. On the 1-inch line, make another mark at 1 1/2 inches from the top edge. Next, you want to make a curved mark.
For this, we used a 1-gallon paint can to create a curve that connects the 1 1/2-in mark and the point where the 4-inch line meets the rafter’s bottom edge. Follow the edge of the can so that you have a rounded pencil mark.
Step 2: Cut The Tails
Now, follow the curved line with a jigsaw to create that gorgeous first tail. Now that you have your first tail cut, you can use it as a template to cut the other boards. Use the same board for each cut instead of using the one you cut next.
After you cut the boards, lightly sand them with 120-grit sandpaper. You should simply smooth them out, they don’t need to be roughed up or bared down.
Step 3: Cut The Purlins
A purlin is a horizontal beam that runs along the length of the pergola. It rests on the main rafter and supports the other rafters. So it’s time to build these by taking the 2×2 boards and working on them.
Take the first 2×2 and draw a 45-degree line across one corner at 1/2 an inch from the top edge. Then take a miter saw and saw at a 45-degree angle. Using a miter saw to cut angles isn’t easy and it does take practice.
Step 4: Paint Or Stain
After you cut all of the purlins, it’s time to start the fun part. Lightly sand everything well and then get your paint or stain ready. Either works but now is a good time to paint them because it’s difficult to do later.
After the first coat dries, add another coat. Then, finish with a sealer to the top which will protect the pergola from the weather. Ensure that you use an outdoor sealer that is safe to use on wood and on whichever type of paint you used.
Step 5: Install Brackets
The brackets for the pergola can be designed any way that you want them to be designed. Just make sure that you choose brackets that are meant to hold up the weight of the pergola. A minimum of 2×6 brackets will be needed.
When installing them to the garage or house, you need to apply caulk to the back to hold it into position while you screw them in. Make sure that you use deck screws as they will give the most support for the job.
Step 6: Mark Rafters And Cut Spacers
Lay the rafters out so that they are flush on both sides and all of the curves line up. Then mark a spot 6 inches in from each end and draw a line over each bracket. This is the fastest and surest way to mark them.
To position, the rafters, subtract 4½ inches, which is for the three 2x4s, from the depth of the brackets, 24 inches. Then divide by 4 to get an even spacing of just under 5-inches. Cut spacer blocks at 4⅞ inches.
Step 7: Place Purlins
Clamp the spacer blocks onto the rafters to ensure they are spaces evenly. Then, you can install the purlins. We had 14 purlins, or 28-inches of thickness, that we spaced out evenly along the clamped together rafters.
After you have them all in position and ensuring that they are evenly spaced, screw them in. Then you can remove the spacers and get to work installing the pergola to the brackets. And it all starts with centering.
Step 8: Install Pergola
Placing the pergola top somewhere between a quarter of an inch and a half-an-inch from the siding. Then, ensure that the pergola is centered by finding the center of the siding and the center of the pergola.
After you do, mark each and screw the pergola into the brackets. Keep in mind that this is a small garage pergola, not a full pergola. A full pergola is quite a bit more complicated to build and is not a beginner project.
Building Vs. Buying A Garage Pergola

The thing about garage pergolas is that they are small, so they are easy to build. However, they are also small enough that they are available to buy pre-built from a lot of different stores, and they aren’t outrageously priced.
So choosing between building and buying isn’t easy. Building stuff is fun but buying can be too. You won’t pay more than a couple of thousand dollars to buy a garage pergola that is already ready to use!
It all comes down to whether you can afford the extra money it costs to buy and whether you want a custom project or not. Because then it is all about whether you like the look of one over the other for your garage pergola.
The post How To Build A Garage Pergola And Why You Should appeared first on Home Decorating Trends - Homedit.


0 Commentaires