The terms beadboard and wainscoting are often used interchangeably so if you’re familiar with at least one of them then you know what we’re talking about. They’re both alternatives to tiles and they’re commonly mentioned when talking about bathrooms.

Wainscoting is a kind of wood paneling which can serve various different purposes. It can be used as a decorative element, as insulation or to prevent or cover up water damage on walls and it can be installed at any height. It’s usually found in traditional or rustic bathrooms although it’s not limited to these two styles.
What Is Wainscoting
Wainscoting is a style of trim that is applied to the interior walls of a room. It is a type of molding that is installed on the side of your wall. It gained popularity in the 18th century as a means of providing a more lasting wall surface and aiding in the insulation of a room.
It is now primarily used for ornamentation. Wainscoting is often installed at chair-rail height, which can be adjusted to provide the desired aesthetic.
Wainscoting in the traditional sense can be challenging to install correctly and, depending on the surface chosen and the type of wainscoting in question, it can be rather expensive.
Wainscoting with applied molding is more adaptable and generally cheaper. Molding is put directly to the drywall in applied molding wainscoting, which implies that you need to install it as you’re building your home.
What Is the Difference Between Paneling and Wainscoting?

The major difference between paneling and wainscoting is how much wall surface each of them covers. Paneling is often used to cover the entire surface of the wall, from top to bottom, while wainscoting panels are usually found on the bottom half of the wall.
What Is Wainscoting Made Out Of?

Wainscoting is usually constructed using one of more of the following materials.
Plastic
Made of cellular PVC or a solid surfacing material similar to that used on kitchen counters, plastic has the appearance of painted wood but will not rot, making it excellent for bathrooms, kitchen backsplashes, and laundry rooms.
Solid wood
This is the most common material used to construct wainscoting. To avoid cracks and gaps produced by seasonal expansion and contraction, wood must be installed and finished with care.
Historically, wainscoting was made entirely of solid oak wood panels. Due to their abundance, pine and spruce became attractive choices as well. However, today, practically any wood variety can serve as raw material for wainscotting, depending on the desired finish, color, and price.
Wood is versatile and can be stained, painted, and trimmed to fit your preferred style, taking climate and wood treatment into consideration to avoid rotting or warping.
Vinyl
Vinyl can be utilized in place of traditional wood due to its longevity, ease of cleaning, and water resistance. Vinyl is stain-resistant and is frequently chosen in houses with smaller children.
MDF
Medium-density fiberboard is similar to wood in appearance but does not expand, compress, split, warp, and also doesn’t have any knots. It’s available primed for painting or veneered.
You want to keep water and moisture away from MDF, as it will swell and break down if exposed to it. However, moisture resistant MDF that has been specially treated can withstand steam in bathrooms.
Is Wainscoting Good for Bathroom?

Wainscoting may be installed in any area of your home, even the bathroom, thanks to advances in wood processing technology and a variety of alternative materials. Therefore, if tiles are no longer your style and you’d want to break up the monotony of the wall, bathroom wainscoting may be the right solution for you.
It will shield the walls from damage and moisture and will act as an excellent insulator. Simultaneously, this solution produces a trendy, warm, and rustic ambiance while also increasing the value of your property.
What Height Should Wainscoting Be in Bathroom?

Bathroom wainscoting is typically 38 to 42 inches high, or roughly one-third of the height of the wall. It makes installation easier if the height does not extend above the vanity and sink
If you raise it higher, it can function as a backsplash, though installation will require more effort. Even if you choose a high bathroom wainscoting, stay away from heights greater than 48 to 54 inches.
In any case, while considering bathroom wainscoting, you should always examine the real size of the walls. If you have a small bathroom, the wainscoting height should be reduced, and vice versa.
Bear in mind that dark bathroom wainscoting visually decreases the space, particularly if the ceiling is low. If you’re having trouble visualizing how it will look, use the wall tape trick. Make a mark on it to indicate the appropriate height, and then decide.
Different Wainscoting Types

1. Flat wainscoting
Flat paneling is a style of paneling that has no grooves, bevels, or beads on the front. The gaps between the boards will be the only visual disturbance in a line of flat panels. At times, the seams are left exposed; at other times, they are concealed using wood or metal strips.
Flat paneling is a trademark of contemporary or modern style because it is smooth and sleek. The paneling’s featureless face allows other elements in the room to take center stage.
2. Board & batten wainscoting
Board and batten is a type of wood paneling that is distinguished by its regular pattern of large vertical molding boards referred to as battens. Battens are typically 4 to 6 inches wide and spaced 6 to 10 inches between.
Board and batten paneling has a bold, harsh appearance that was popular in early twentieth-century homes. The battens conceal the gaps between the boards. Additional battens are inserted between the joints for aesthetic purposes alone.
3. Raised panel wainscoting
This kind of wood paneling features a line of squares or rectangles separated by vertical molding every four to eight inches. Raised wood panels with horizontal rails at the bottom and top are formed by deep V-shaped bevels.
Raised panel is a very flashy style that is frequently found in high-end vintage homes. Raised panels generate deep shadows as a result of the deep bevels, creating an extremely eye-catching appearance.
Raised panels are frequently used in conjunction with wainscoting. They are available pre-assembled and ready for installation. Raised panel styles can be molded from polystyrene panels or MDF boards. They can also be constructed entirely from scratch by attaching thin sections of molding to flat panels.
4. Beadboard wainscoting
Beadboard is a type of wood paneling that features long, uninterrupted vertical grooves with raised beads that have one or two inches of space between them.
Individual boards of beadboard measure around 32 – 48 inches long by 3 – 4 inches broad. Boards are side-by-side compatible. Alternatively, big panels of beadboard up to 8 linear feet in length can be purchased to accelerate the installation procedure. Factory construction is when the grooves and beads get molded into the board.
5. Overlay wainscoting
Overlay wainscoting is a hybrid of raised and flat panel wainscoting styles. After installing flat panels, other panels are centered on them. Additionally, these additional panels might be lined with molding to add additional elegance.
Additionally, you can just put a flat wood panel with shaped edges right on the drywall for this wainscoting design. Overlay wainscoting is a type of raised paneling that resembles genuine solid wood and is connected with neoclassical design.
6. Shiplap wainscoting
This is an interior paneling style that takes its name from a type of exterior home siding. Shiplap panels are made out of long horizontal planks that overlap at their long edges. The upper board’s lip overlaps a portion of the lower board. This results in a weatherproof, tight, and sturdy joint in external applications.
Shiplap on the interior is more decorative than functional. Shiplap adds a rustic, attractive aesthetic to bedrooms, dining rooms, hallways, and living areas. Shiplap can also be utilized to create a traditional or farmhouse effect on accent walls.
Bathroom Wainscoting Ideas

Wainscoting can be used as a means to unify a bathroom’s decor and to create a cohesive and matching design which incorporates not only the lower portion of the walls but also elements such as the bathtub or the sink.
Wainscoting, just like beadboard paneling, can be installed at any height, depending on the height of the fixtures, furniture, windows and various other design elements. Usually it contrasts with the upper wall sections.{found on cmahnken}.

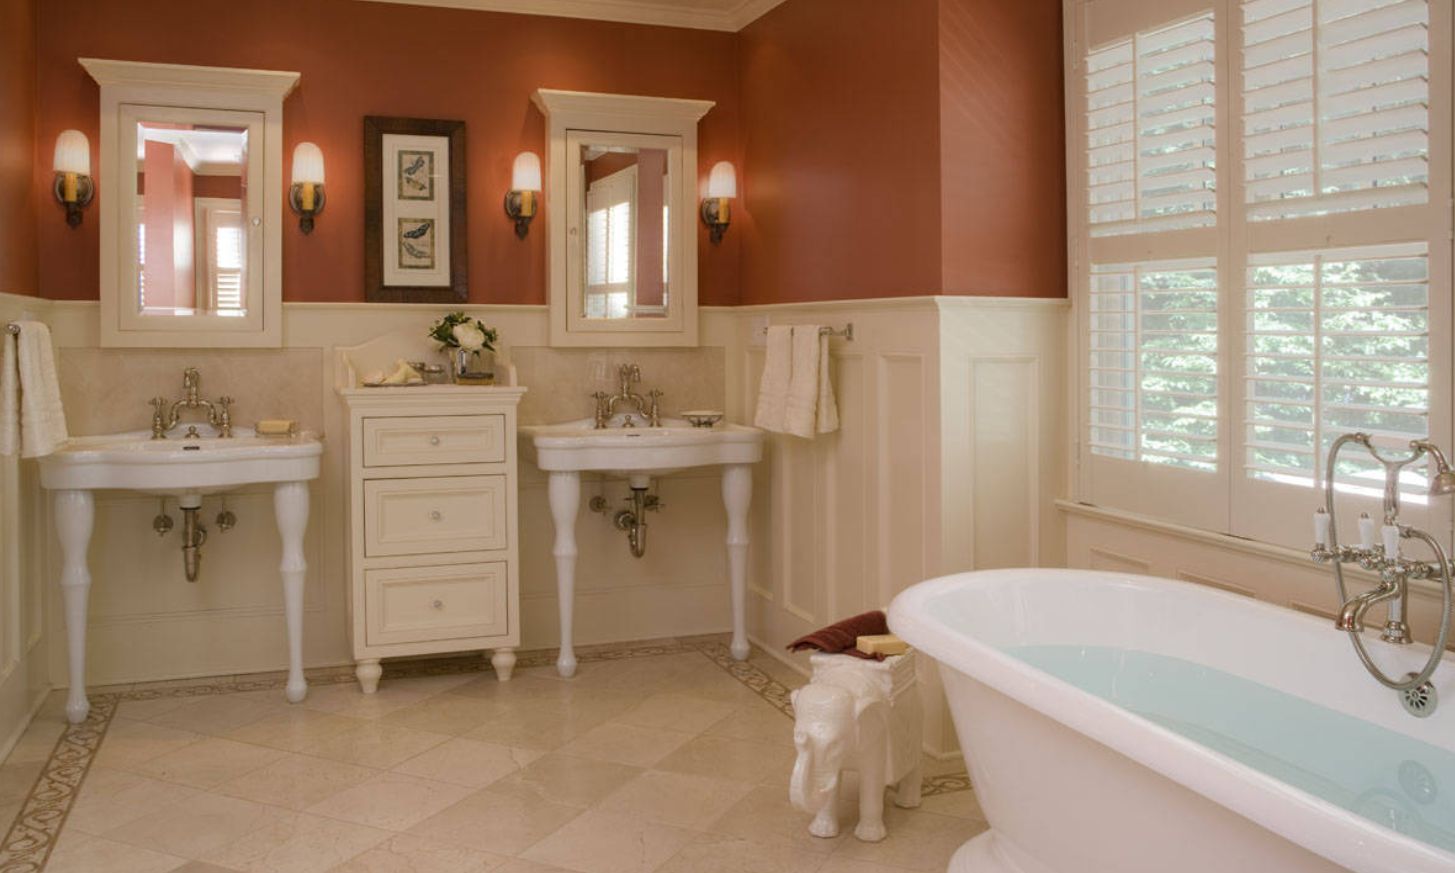
Bathroom wainscoting can be very practical, especially if you have a freestanding tub and you want to protect the walls from water damage. Further more, the wainscoting can continue on the adjacent walls and it can frame all sorts of features, including benches and vanities.

Think of wainscoting as a special alternative to wall tiles. While tiles tend to create a cold and distant ambiance, wainscoting makes bathrooms feel warm, welcoming and a lot more comfortable.{found on studios2arch}.
It’s easy to mistake wainscoting for beadboard panelling and vice versa and the truth is a lot of times the differences between them are totally ignored. In case you’re curious, beadboard panelling is defined as a row of narrow wood planks lined up vertically, with little indentations (beads) between them.

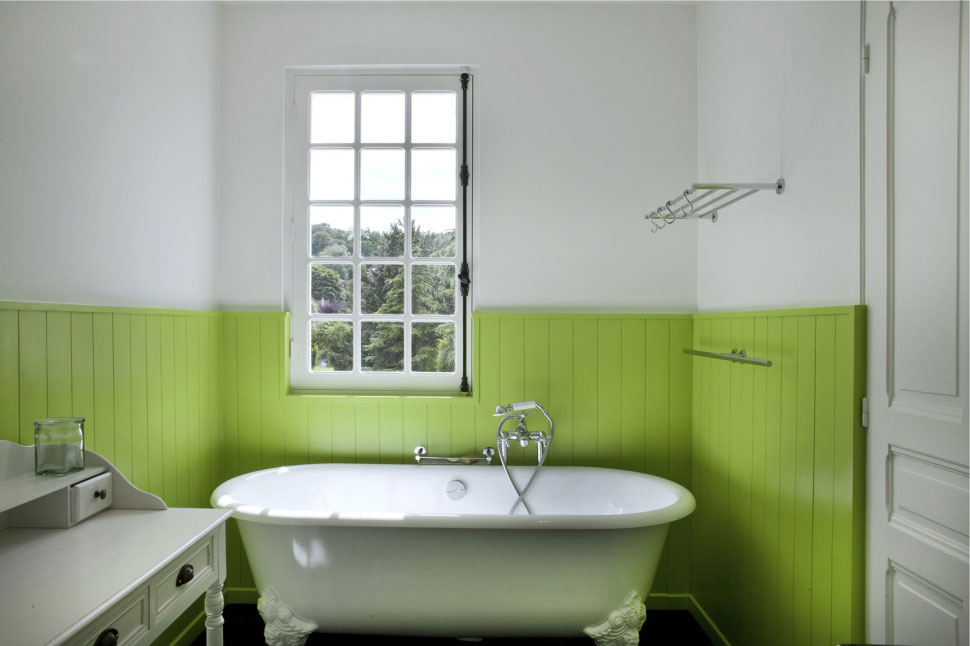
You can match the wainscoting to your bathroom cabinetry if you intend to create a uniform and cohesive interior decor with a dominating accent color. This traditional bathroom features a very beautiful tone of turquoise that looks very chic when paired with white.{found on carpentermacneille}.

The opposite is also a possibility. By that we mean that the bathroom walls can be painted in a particular accent color and that the beadboard or wainscoting can be white. The flooring an match either of these elements or none of them.{found on newold}.

Bathrooms with wainscoting or beadboard walls can come out as looking outdated and while that is often the case it doesn’t mean you shouldn’t consider this design direction for a modern or a contemporary bathroom. Anything can be adapted to suit a particular style. It’s all in the details.{found on timandersenarchitect}.

The beadboard panelling can be planned in such a way to also incorporate the backsplash. Feel free to attach accessories such as towel rings and racks, wall decorations and even shelves.

Sometimes wainscoting just makes sense in a bathroom. Here, for example, the decor just wouldn’t be the same without the black backdrop. Symmetry is an important part of this bathroom’s eye-catching interior design.{found on bianchinicapponi}.

There are many different ways in which you can make bathroom wainscoting look elegant and natural. It’s important to consider this feature in the context of the entire room and in relation with various other design elements.

A possibility is to match the wainscoting to all parts of the floor, ceiling or furniture as a way to establish continuity throughout the room’s decor. Other elements to match it to can include the door and window frames.

Most often, the boards are arranged vertically whether we’re talking bedboarding or wainscoting. However, a horizontal placement of the boards shouldn’t be dismissed entirely. Actually, you can combine both options if you want to.

Vertical lines emphasize the height of a room which means, naturally, that horizontal lines highlight the width and length. You can take advantage of these details to ensure the best possible design scenario for your bathroom, wainscoting or not.

The cool thing about bathroom wainscoting is that it can be painted to match the walls, the furniture and all sorts of other elements in the room. In this case, various nuances of the same color were used throughout the space.
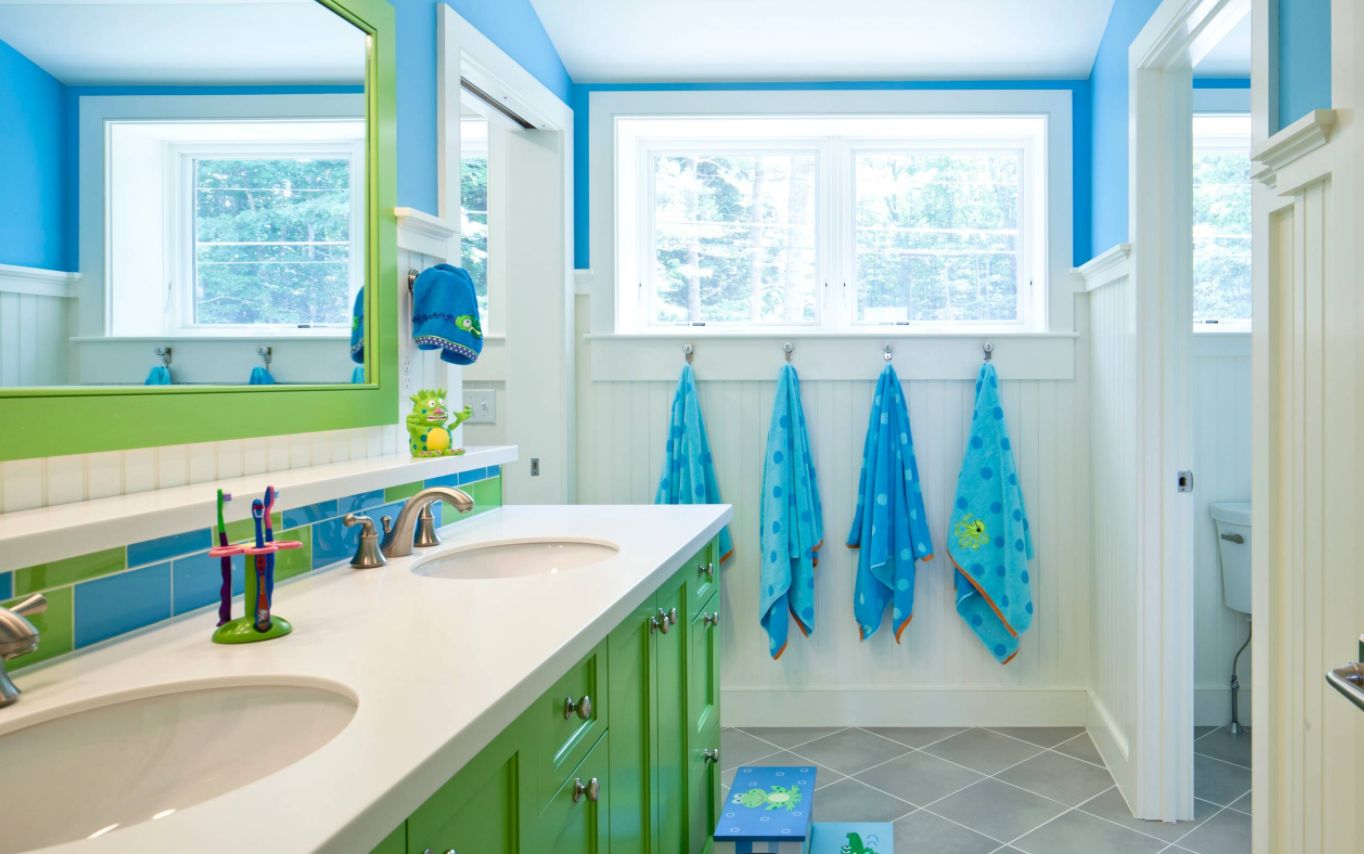
Sometimes a lack of color can be exactly what is needed to establish balance in a room’s decor and ambiance. Here, for instance, green and blue are blended throughout the decor and the white beadboard paneling helps to highlight these colors while also keeping the overall decor harmonious and fresh.

Paint the bathroom wainscoting in a color that defines the theme you’ve chosen for the space. For example, if you want a natured-inspired decor or a zen or spa ambiance, you can work with tones of green, beige and grey combined with white.

As versatile as wainscoting may be, rustic and traditional bathrooms still remain the best places for it so think of how you can take advantage of that when planning your next bathroom remodel.

Wainscoting can also help to make a bathroom look more refined and elegant, being an interesting alternative to regular wall tiles better suited for bathrooms that aim at a comfortable and welcoming decor similar to that of living rooms.
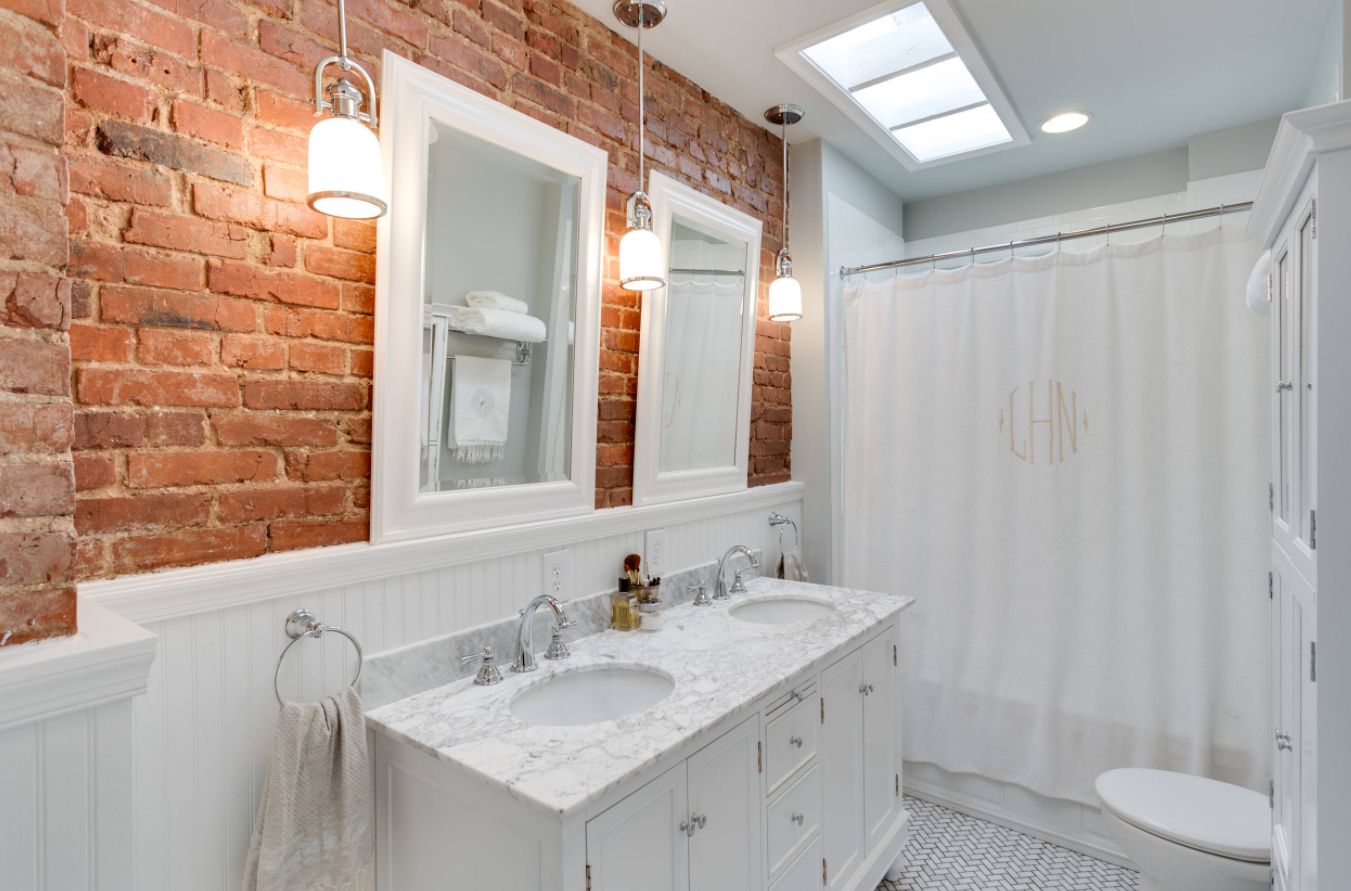
You don’t need smooth walls to install beadboards or wainscoting in the bathroom. In fact, sometimes this is a cheap and quick way of covering up old and damaged tiles without first having to take them down.
How to Install Wainscoting

Wainscoting installation isn’t complicated, but it can be time-consuming. If you’re interested in tackling this project by yourself, here is a tutorial that will help you see this project through.
What you’ll need:
- Wainscoting panels
- Paneling nails
- Construction adhesive
- Moulding
- Safety gear (glasses, dust mask, gloves, hearing protection)
- Voltage detector
- Screwdriver
- Pry bar
- Stud finder
- Tape measure
- Level
- Hammer
- Jigsaw
- Circular saw
Step One
Divide the room’s entire linear footage by the panel width in feet. If the result contains a fraction, it should be rounded to the nearest whole number. That is the quantity of panels required.
Step Two
Using a pry bar, get rid of chair rail or baseboard moulding. If the moulding is to be reused, take care not to harm it during removal. Turn off the room’s electricity. Ensure that the power is turned off with a circuit tester and remove any wall plates and outlet covers from the room.
Step Three
Create a straight line for the top of the panels. Make a mark 32-1/2 inches up from the floor. Draw a line around the area using a level. When installing the wainscoting, ensure that its top is parallel to the level line. Due to the 32-inch height of wainscoting, measure up 32-1/2 inches all the way around to account for any issues generated by an uneven floor.
Step Four
Utilize a stud finder to locate the wall studs and lightly mark them slightly above the level line. The markers will come in handy when nailing the wainscot panels into position.
Step Five
To install the first panel, begin in one corner of the room. Adhere construction glue to the panel’s back and secure it in place. The panel’s top edge should be flat with the wall’s level line and 1/16-inch away from the adjacent wall.
Step Six
Secure the panel in place with paneling nails. If the panel covers an outlet, prior to installation, cut a hole for the outlet.
Step Seven
Measure from the bottom and top edges of the outlet aperture to the level line. Draw horizontal lines on the panel behind the markers, then transfer these measurements to the panel’s back.
Measure from the right and left sides of the outflow hole, finding the middle. To account for the gap between the corner and the panel, subtract 1/16 inch from each measurement.
Measure the panel first, then transfer the measurements to the back of the panel. Draw vertical lines on the panel using the transferred measurements. In order to form a vertical rectangle, the lines need to be vertical. With a jigsaw, cut out the rectangle and then install the panel.
Step Eight
Installing the second panel 1/16 inch from the first, but making sure it is flat with the level line can yield better results. Install panels in this manner until you reach the next corner. As with previous steps, drill holes for any light fixtures, but measure from the right edge of the preceding panel rather than the corner. Bear in mind the expanding gap.
Step Nine
It is unlikely there will be enough room to put a whole panel at the corner, therefore you will need to trim one. Subtract 1/8 inch from the top of the last full panel to the wall (this will be your first mark). Subtract 1/8 inch from the bottom of the previous entire panel (this will be your second mark). Copy the measurements to the back of the panel you’re cutting, drawing a line between each mark.
Face the panel down and cut it with either a circular saw or a jigsaw. Take measurements from the bottom and top to account for any non-square wall crossings. Once cut, position the panel 1/16 inch from the end of the last entire panel. There will be a 1/16-inch expansion space between you and the opposite wall.
Step Ten
Complete the remainder of the wainscoting installation. Once all of the panels are in place, install the chair rail and baseboard moulding, as well as the wall plates and outlet covers.
FAQ
Is Wainscoting Cheaper Than Tile?
Wainscoting made of wood is more forgiving than tile. It’s simple to install, accommodates the waiver walls of an older home, and eliminates the need for a million tile spacers that don’t always stay in place as they should.
Numerous profile possibilities are period-appropriate for our property, and basic tongue and groove boards make for fast and easy installation. As a bonus, wainscoting is cheaper than tile.
Is Wainscotting Outdated?
From a practical point of view, wainscoting is outdated. That’s because, in the past, it was used for insulation purposes and, since modern homes have default insulation, wainscoting doesn’t really serve that purpose anymore.
However, from a decorative point of view, wainscoting will never really go out of style, since there are many different styles to choose from. With the proper application, this time-honored design element may appear current and could easily find its way even in a contemporary setting.
How Thick Should Wainscoting Be?
It really depends on the type of wainscoting chosen and whether or not you want to use it for insulation purposes or purely for decorative reasons. In general, the standard wainscoting thickness is ⅝ inches.
Does Wainscoting Make a Room Look Bigger or Smaller?
If you’re seeking to make a space appear and feel larger, wainscoting may not be the best option. While it is well known that wainscoting makes a space appear smaller rather than larger, this does rely on the color of the panels and their height. Wainscoting is mostly used to protect the lower portion of a wall and to enhance the aesthetics of a room, rather than for sizing considerations.
Is Wainscoting Waterproof?
Not all wainscoting is waterproof, as it really depends on the material used to construct the panels or if the material has been treated to resist moisture. For instance, PVC wainscoting is often chosen for bathroom installation because it’s water-resistant and relatively cheap.
The post Bathroom Wainscoting – What It Is And How To Use It appeared first on Home Decorating Trends - Homedit.


0 Commentaires