In the magical season that is Spring, you may find yourself wanting an opportunity to either develop or showcase a green thumb. Whether you live in wide open spaces or in a tiny urban apartment with a small balcony, one way to fit in a bit of growing greenery is to build a beautiful, functional, and fully DIY raised planter box.

What Grows Best in a Raised DIY Planter Box?
A DIY raised planter box can be an amazing addition to your garden. Besides just flowers for decoration, they can also be used to hold almost anything you can grow in a garden, including spices, fruits, and vegetables.
Some plants do better in planters than others, however, and below are a list of the plants that do the best when grown in a planter.
Foods That Do Best in a Planter:
- Basil
- Green Beans
- Peas
- Radishes
- Strawberries
- Tomatoes
- Potatoes
- Peppers
- Parsley
Flowers That Do Best in a Planter:
- Begonia
- Celosia
- Geraniums
- Impatiens
- Coleus
- Marigolds
- Petunia
- Salvia
- Creeping Phlox
- Zinnia
What Kind of Wood Should I Use for a DIY Raised Planter Box?
When it comes to creating your DIY raised planter box, you will want to make sure that you build it out of quality wood. This is because your planter will likely be spending most of its time outside, and it needs to be somewhat resistant to things like insects and the elements.
Additionally, you need to consider the type of wood you build your planter box out of as well, as this will dictate how sturdy your planter box is, and ultimately, how long it will last. For best results you will want to use one of the following types of wood to build your planter box.
- Cedar
- Oak
- Redwood
You can also use pine to create a DIY raised planter box, but pine should only be used for planters that will be placed indoors.
How Deep Should a Raised Planter Box Be?
Before you start building, you need to have a plan of how deep your raised planter box will be. Different plants will require different depths of soil in order to grow.
Generally, most plants will flourish in 6 to 8 inches of soil. There are a few exceptions to this however. Cabbage, for example, requires at least 10 inches of soil to flourish.
The most difficult plants to grow in a planter are carrots, tomatoes, and peppers, because they need a planter of at least 12 inches to flourish. Not only that, but they also need to be properly spaced to allow them room to grow. Flowers with large bulbs need a soil depth of at least 14 inches.
So prior to heading to the store to get construction supplies, take the time to make a list of all the plants you would like to grow in your planter, and double check the soil depth you need. This will let you know how deep to make your planter box.
Why is Soil Depth Important?
The whole reason you are building a planter is to grow some beautiful flowers and tasty veggies. If the soil in your planter is not deep enough, the plants will be unable to grow proper roots and will not flourish. Improper soil depth will leave you with underperforming plants or seeds that don’t sprout at all.
How Do I Know If My Plants Are Cramped?
Do you think that there might be too many plants in your DIY planter? Or perhaps your plants don’t have sufficient root space in your raised planter box? The number one way to know if your plant is experiencing cramped roots is if it starts to have chronically yellowing leaves, and leaves that are too small for the plant.
You may also notice that your plant isn’t growing as prolifically as it did before, and that it is wilting.
What Do You Put in the Bottom of a Planter Box?
When a raised planter box is on the tall or deep side, you may need to put some items in the bottom to get it at the right height to plant your plants. You have many options of what you can fill your planter with. Some ideas include:
- Crushed Aluminum Cans
- Plastic Milk Jugs
- Plastic Water Bottles
- Plastic Soda Bottles
- Empty Potting Soil Bags
- Plastic Garden Liner
- Rocks
- Pieces of Cement
How to Build a Raised Planter Box for Your Garden


Whether you want a flower box, an herb garden, or even a place to grow and harvest your very own vegetables, this DIY project allows you to do it – and as a raised box plan, it won’t kill your back to plant (and/or encourages the kids to garden alongside you). A DIY raised planter box is ideal for anyone who is short of space in their garden or doesn’t have the space to plant anything on the ground. You could even add this to a large balcony in an apartment. If you do have a larger garden, consider making multiple raised planter boxes by repeating our guide here today.

DIY Level: Intermediate

Materials you’ll need to build the Raised Planter Box:
- One (1) 12’ 4×4 redwood post (or four posts cut to 3’ lengths)
- Two (2) 4’ 1×8 cedar planks
- Two (2) 2’ 1×8 cedar planks
- Six (6) 2’ 1×4 cedar planks
- 2’ wide 1/4″ grid hardware cloth (aka wire mesh)
- 24 (or more) 1-5/8” exterior screws
- 16 3/8” x 2” long hex screws and washers
- Staple gun, ratchet, sander/sandpaper, exterior wood stain
- Landscape fabric (aka weed barrier)
- Potting mix or soil + seeds/plants
Equipment Needed:
- Compound miter saw (aka “chop saw”)
- Power drill
How to build the Raised Planter Box: DIY step by step project for beginners

Step 1: Measure the wood post
Begin by measuring your 4×4 post into four equal lengths (if you haven’t done this already).

Step 2: Cutting the wood
Use your miter saw to cut the post into four equal 3’ lengths. Repeat the process with your other pieces of wood so that you end up with two 4’ lengths of 1×8, two 2’ lengths of 1×8, and six 2’ lengths of 1×4.

It probably goes without saying, but remove any type of staple or alien material on the ends of your wood pieces. You want your wood to be in the best condition possible at this point in the process, to create the perfect raised planter box for your garden.

Step 3: Angle cutting
If your miter saw cuts angles, you’re in luck. Simply measure and mark 1” lines from what will be the top ends of each of your 4×4 posts. Set your miter saw at a 45” angle, and make four cuts to each post, rotating the post 90 degrees (to a new side) after each cut.

This adds a nice finishing touch to the post-tops, which will be visible with this raised planter box plan design.

If your miter saw doesn’t rotate vertically for angle cutting, that’s okay. Measure 1” in from the sides of your post, right along the top edge.

Set your miter saw horizontally to cut 45 degrees, then line up the 1” points with the saw and make your cuts. Do two opposite sides first, then rotate your post 90 degrees. Match your saw blade to the outer cut points, and cut the other two opposite angles.

Repeat the process described above to complete cutting the tops of all four posts.

Step 4: Measure and Mark the Posts
Lay your 4×4 posts down and measure 31” from the bottom of each post on just two adjoining sides.

Mark on both sides of the measuring tape for each side.

Marking on both sides of the measuring tape gives you two points of reference for levelness. What you’re marking is the point at which the top of your 1×8 side boards will be attached.

On your two 4’ long 1×8 boards, you’re going to mark two points; these are for the hex screws to attach the side boards to the 4×4 posts. Measure 1-3/4” in from the sides of your 1×8 boards, and 1-3/4” in from the top/bottom of the boards.
Step 4: Drilling

Step 5: Drilling
Make an “X” to mark the precise points you’ll be predrilling for the hex screws.

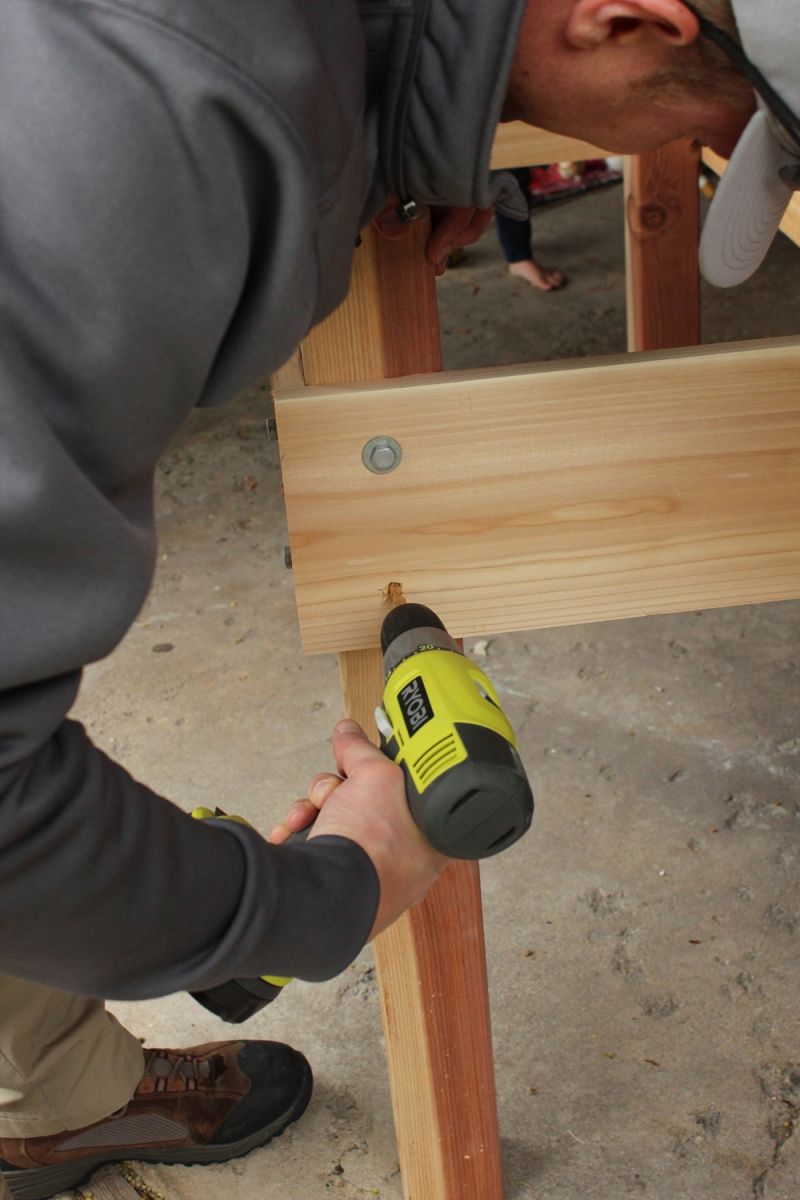
Line up the top edge of the 1×8 board with the 31” mark that you made on one of your posts. Use a drill bit of your choice (example uses a 1/4″ bit) and predrill the holes.

Place a washer then hex screw into each predrilled hole.

Tighten up the hex screws with a ratchet until they’re pretty tight. Don’t overtighten that the cedar board splits, however. That’s counterproductive. The last thing you want is to ruin your precious work at this point, or you’ll be back to square one. Take your time throughout the process and don’t rush any stage to ensure you create a high-quality DIY raised planter box.

1-3/4” is a nice measurement here because a 4×4 post really measures in at 3-1/2”, so that makes the hex screws perfectly centered on the post.

Step 6: Attach the Boards
Once both 4’ long 1×8 boards are attached to the posts, it’s time to attach the two 2’ long 1×8 boards. The hex screws that attach these two 1x8s shouldn’t hit the other hex screws. You can make sure of this by holding up a 2’ board next to the post, and holding up the hex screw as well.
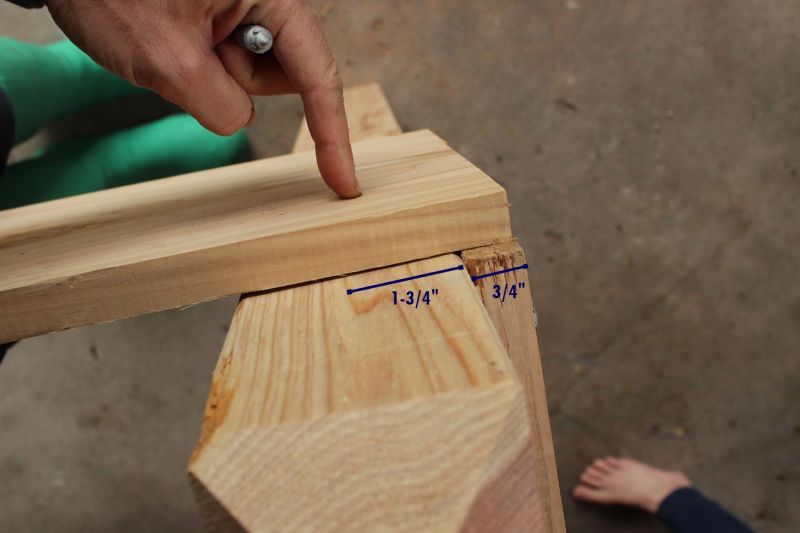
Although you want these next eight hex screws centered on the posts, you won’t be measuring in 1-3/4” from the sides of your boards because you have to factor in the 3/4″ width of the 4’ board that’s already attached to the post.

So your side markings for your 2’ long 1×8 cedar boards will be 1-3/4” from the top/bottom of your board (same as the 4’ lengths) but 2-1/2” in from the sides. (2-1/2” = 1-3/4” [post center] + 3/4″ [other 1×8 actual width])

Again, mark your drilling points with an “X.” Ensure these are accurately measured on either side for best results.

Step 7: Predrill the Board
Predrill just through the board at this point (as opposed to predrilling through the board and post together). Although these holes are further from the ends of the 2’ boards than the holes for the 4’ lengths, it is still highly recommended to predrill. Cedar is prone to splitting, and this extra step doesn’t take much time but adds a lot of precision and protection from board split.

Step 8: Attach the Boards to the Posts
When your 2’ boards have been predrilled, have a helper hold up the 4’ board attached to the posts. Align one end of a 2’ board with your 31” height line (or with the 4’ board if you prefer; hopefully the alignments are one and the same), and drill a bit into the 4×4 post through the top predrilled hole.

Attach the washer and hex screw into this predrilled hole with a ratchet. Repeat for the other top hole, on the opposite side of this 2’ board.

At this point, you should have the top two hex screws holding the 2’ board in place while also connecting the posts into a three-sided structure.

Step 9: Repeat the Process on the Other Board
Measure, then predrill the four holes on your other 2’ long 1×8 board. You can use the structure as a sort of saw horse, if you’d like. Just take care not to drill into any wood that’s already in use or attached.

Repeat the process, on this second 2’ board, of attaching just the top two hex screws. This stabilizes the structure, making it much easier to install all the bottom hex screws onto a solid structure with the boards accurately in place.
Predrill the posts for the bottom holes on your 2’ boards, then install the bottom four hex screws (two per board).

Step 10: Flip Your Planter Box Over
Measure the width of your planter box; it should be 2’ wide. Carefully flip your planter box over so it’s resting on its post-tops.

Step 11: Prepare the Hardware Cloth
Take your 1/4″ hardware cloth (aka “wire mesh”) and get it ready to unroll.

Wear gloves when working with this stuff. It’s safer, easier, and more efficient. While you may be tempted to skip wearing gloves, you’ll want to protect your hands when cutting this material as it can easily scratch or injure you.

Allow for at least 7” of additional length from the inside side of your 4×4 posts, then unroll the hardware cloth until it reaches the other two 4×4 posts. Unroll at least 7” more, then mark your cutting spot. Use wire cutters (aka “tin snips”) to cut the hardware cloth.

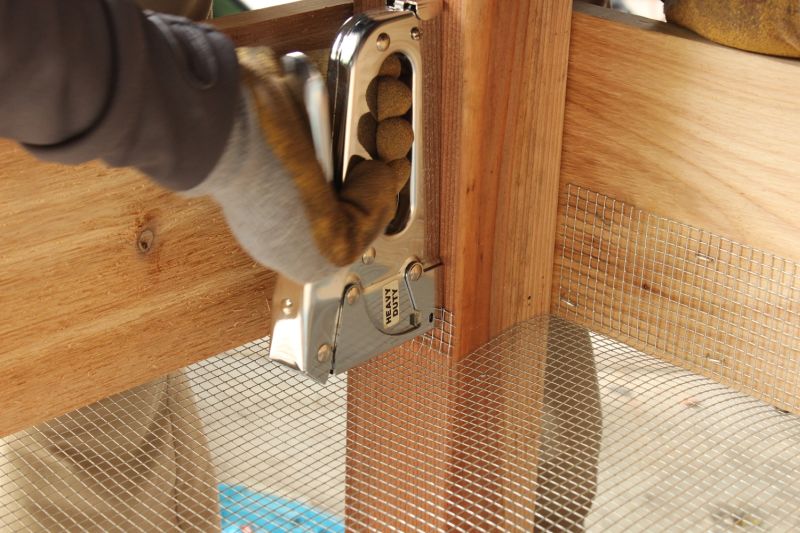
Step 12: Secure the Hardware Cloth
Throw a few staples from your staple gun to attach your hardware cloth to what will be the bottom edge of your 4’ long 1×8 sides. Only staple near the center of the planter box at this point, just enough to hold the hardware cloth in place while you work out the corners.

Run your extra hardware cloth up one of the 4×4 posts to determine where you should cut to work around the post.

Begin with a short snip in from the side, up to the corner of your post.

Step 13: Finish Off Installing the Hardware Cloth
Next, snip from the end of the hardware cloth along the corner of your post down until you reach the same horizontal point as your first snip (which should be even with what will be the bottom edge of your 1×8 board).

Repeat for the other post on this end of the planter box so that you can flatten the inner part of the hardware cloth, between the two posts.

Carefully fold the newly cut corner “flap” downward along the post, into the inner portion of your planter box.

Bend the thin portion of the flap so that it touches the side board.

Once the flap is folded and in place on the inside of your planter box, staple the edges of your hardware cloth all the way up to the 4×4 post. Repeat for the other flap on this side of your box.

With your hardware cloth stapled into place, you can more easily work with the inner portion, between the two posts. Fold it so it will tuck up inside the planter box.

Push the hardware cloth down so the fold is even with what will be the bottom edge of your raised planter box.

Step 14: Repeat the Steps on the Other End
This is what your box will look like at this point. Repeat all these steps for the other end of your box, so that you can flip your box back to upright and continue working on it that way.

Because you don’t want massive amounts of extra hardware cloth poking out of your box, to rust, snag, or cause hurt, it’s time to trim. We’ll start with the first folded flaps near the box post. You only need to keep enough to staple securely, about 2”.

Step 15: Trim the Flaps on All Four Posts
Trim the flap to about 2” high, and throw the rest away. Repeat for the flaps on all four posts.
Staple what’s left of the flaps securely to the posts or planter side boards.

If the ends of your hardware cloth are short enough (anything shorter than 4” is probably fine), go ahead and staple it to the 1×8 end boards.

If the ends of your hardware cloth are longer than you want, it might be easier (and less sharp) to simply fold them over and staple them. We found it easiest to carefully tip the planter on its side to do this.

Fold the ends of the hardware cloth over so that the ends are sandwiched between the rest of the hardware cloth and the side board. Staple in place.

Step 16: Installing the Cedar Boards for Support
When the hardware cloth is completely secured and in place, it’s time to support it with some 1×4 cedar boards. Flip your planter box over to rest on its post-tops. Lay out your six 1×4 boards evenly.

Predrill each 1×4 support board as it rests in place on the bottom of the 1x8s. The hardware cloth will be sandwiched between these two boards.

Grab some exterior screws. We had 1-5/8” handy so used those, but anything over 1-1/4” would probably be fine.

Screw in your screws to the predrilled holes.

Step 17: Sand Down Any Rough Spots
Sand any obvious rough spots, such as the ends of your 1×4 boards.

If you want to sand the post-tops (which is recommended), it might work well to use an older bit of sandpaper, so you smooth the wood but don’t take off too much of your cuts.

Lightly sand all other edges and corners and surfaces as you want.

Congratulations! It’s built! The hard part is definitely over. However, there are a few more steps to go in our DIY raised planter box, and then your work will be completed.

Step 18: Treat the Wood
Although you’ve (hopefully) used outdoor-friendly wood, like cedar and fir, you’ll still do well to treat the wood to withstand the elements and last longer. We used Australian timber oil in Mahogany Flame to stain and protect this planter box. Let it dry, then move it to the place in your yard, balcony, or deck that you plan on using the raised planter box.

Step 19: Add Breathable Landscape Fabric
Cut, fold, and staple breathable landscape fabric (aka “weed barrier”) to the inside of your planter box. Make sure you fit this well to avoid any weeds from growing and damaging the plants you plan to add to your raised planter box.

Although this step (adding landscape fabric) is optional, doing so will help to keep your soil in the box while allowing excess moisture out of the box.

Step 20: Add Potting Mix or Soil
Grab a big bag of potting mix or soil of your choice.

Fill your planter box about 2/3 full. Make sure you distribute the soil evenly throughout the raised planter box, so there are no gaps or thinner areas.

Step 21: The Final Step – Add Flowers, Herbs, or Plants to Your Raised Planter Box
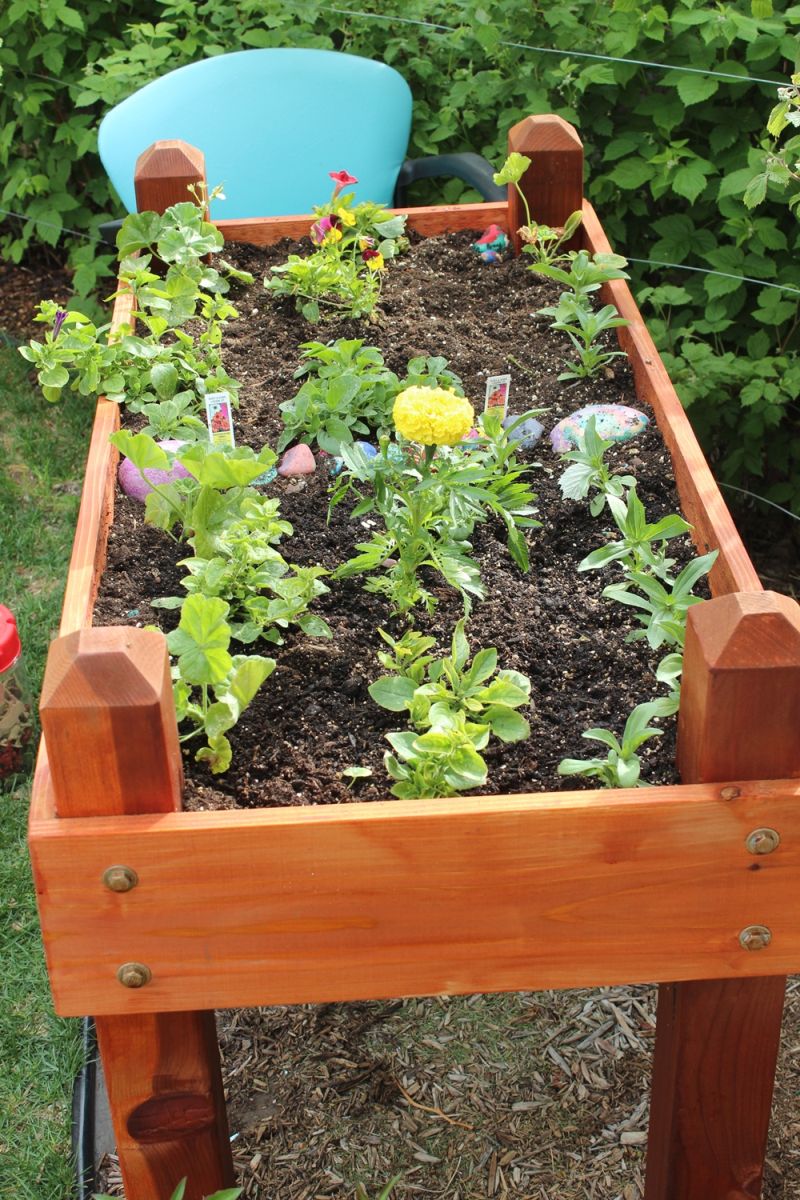
At this point, the raised planter box is yours to do with what you want. Throw some vegetable seeds in there, plant a few flowers, section out some herb plots, whatever. As for our raised planter box, it was to be a flower box shared by two of our young daughters, who wanted their spaces divided and designated with rocks they had painted during the “boring” part of the construction.

They chose a variety of flowers to incorporate – marigolds, petunias, pansies, geraniums, zinnias – and placed them lovingly and carefully. The raised planter box design is fantastic for this!
The great thing about a raised planter box is that you can easily move it around your garden or add it to a balcony or patio if you are short on space. If you find that your plants aren’t getting enough sunlight in their current location after a short while, simply move it elsewhere in your garden. Some people like to focus on seasonal flowers, and a few times a year they’ll completely redesign the raised planter box to keep up with the current season.
When all is said and done, it might look a hodge-podge this year, but the raised flower planter box is a pride and joy to all members of our family. It’s the perfect way to teach your kids about gardening and looking after plants, and they’ll love checking on the progress of their work during the upcoming weeks and months.

We love how it brightens up a currently colorless corner of our yard. Of course, you could opt for even brighter blooms in your DIY raised planter box, which will soon make it a focal point in your garden.
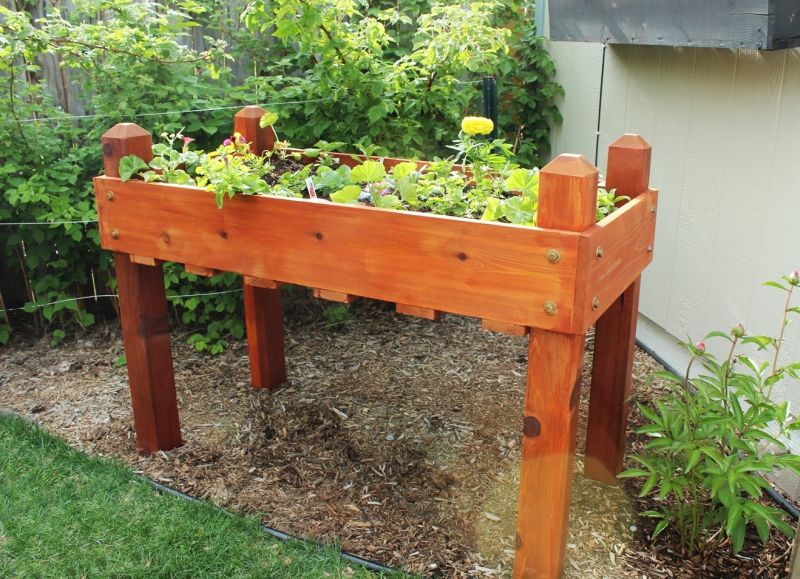
The box is tucked away between a backyard shed and some raspberry bushes. The mahogany flame hue looks fresh and bright in this setting.

Next, we will run a drip hose discreetly up into the box so the flowers have an actual shot at life. Otherwise, well-intentioned as we all are around here, relying on manual watering methods, there’s really no hope for flora survival.

This is a wonderful addition to a backyard, a front yard, a side yard, or even a deck or balcony. The raised planter box design is easy on one’s back and just different enough from other flower beds or herb or vegetable gardens that it’s eye-catching and a treat to look at. We think this is a wonderful project for the whole family to be involved in, and kids will love having their own section of your new raised planter box to look after by themselves. While it may look like there were a lot of steps involved, you’ll be pleased with how quickly everything comes together in your new DIY raised planter box this year. We hope you enjoy making your own and growing the things you love.
FAQs
Do Planter Boxes Need to Be Lined?
If your planter is made of wood or metal, you will need to line it. You can line a planter box with plastic garden liner or concrete.
Should I Put Rocks in the Bottom of a DIY Raised Planter Box?
It is suggested that you have a layer of rocks at the bottom of your planter to keep water from leaking out. You need at least one rock at the bottom of your planter to block the drain hole and keep the soil in the planter.
How Do I Keep a Wooden Planter From Rotting?
You can keep a wooden planter from rotting by lining the planter with plastic. This keeps water and fungus from coming into contact with the wood. You can also treat your wood to lengthen its life.
Do All Raised Planter Boxes Need Drainage Holes?
While most plants do need drainage holes to stay healthy, it is not required for all planters to have drainage holes. If you are in doubt whether or not your plant needs drainage holes, it’s always better to just make some than risk going without.
Can I Use Activated Charcoal in a DIY Raised Planter Box?
Yes! Activated charcoal is great for plant health. It helps to enrich the soil and rids of its impurities.
Is it Cheaper to Build Your Own Raised Planter Box?
Purchasing a planter box can often be an expensive endeavor. This is especially true when you are looking for a larger planter, or one to fill a specific space. For this reason it is typically much cheaper to build your own planter box.
Is It Easy to Build a Raised Planter Box?
Building a planter box, while not easy, is actually not that difficult. Those who are experienced in cutting wood will find that the project takes them less than an hour.
Final Thoughts
As you can see, a DIY raised planter box is an amazing addition to your home. Not only can it grow almost any plant you can think of, but the fact that you are building it yourself means that it will fit in perfectly into the aesthetic of your backyard.
Building a DIY raised planter box isn’t difficult, so there’s no reason to hesitate. Head over to your local hardware store and start building your DIY planter today so you can have the garden of your dreams
The post DIY Raised Planter Box – A Step-by-Step Building Guide appeared first on Home Decorating Trends - Homedit.


0 Commentaires