Plants are great for many reasons as they don’t require much attention. How will you take care of your plants when you’re away from home for extended periods? In some ways, plants are like pets except you can’t take them with you.
DIY self-watering planters offer a solution for when you’re away from home. You can buy self-watering planters, but according to market research, they’re pricey. The ones we’ll look at here are cheap and easy to make. The devices on this list offer specific water delivery that regular watering tools don’t and for the best budget.
In a rush? Here’s a rundown of the most important headings about self-watering planters.
- Self-Watering Planters
- How Often To Add Water To Self-Watering Planters
- How Do Indoor Self-Watering Planters Work?
- How Do I Make Planters Self-Water?
- Can You Put Rocks At The Bottom Of A Self-Watering Planter?
- Best Plants For Self-Watering Pots
- Pros And Cons Self-Watering Planters
- DIY Self-Watering Herb Planter Box
- Quick and Simple DIY Self-Watering Planters Ideas
Self-Watering Planters

For indoor gardeners who want to save water, the planters are ideal. Their overflow system helps prevent root rot, which can destroy plants. The drainage holes at the bottom of the planter drains excess water and maintains plant health. The planters use exact water amounts, which reduces water waste. Some self-watering planters come with a moisture-wicking system, adding to their efficiency.
Self-watering planters provide your greenery with nutrients, food, and water. The slow release of these nutrients can help them thrive for three or four weeks.
How Often To Add Water To Self-Watering Planters
 How Often To Add Water To Self-Watering Planters” width=”1000″ height=”667″>
The self-watering mechanism comes with a water level window. When you can’t see water in the window that’s. how you know the water is low. Regular sizes will need water every week or two.
They help achieve just the right amount of moisture while the water goes right to their roots. These methods also reduce fungal diseases, making the houseplants live longer.
Self-watering planters work best for certain types but aren’t best for every plant species. They work best for tropical plants and vegetables. However, greenery that needs to be moist will struggle. Here are a few indoor plants that either benefit or shouldn’t be used with a self-watering mechanism.
Snake Plants
Snake plants need water when their soil is dry. During the summer, water them once every 15 days. When one inch of the soil is dry, add half a cup of water for small plants. Add one cup for medium sizes and one and a half cups for larger ones. In the winter, the house plants can be watered once a month.
Spider Plants
Water spider plants when 50 percent of the topsoil is dry. Add enough until it flows through the hole at the bottom of the pot. You’ll need to keep the plant in an area where there is plenty of sunlight.
Tomato Plants
Tomato plants should receive one or two inches of water each week. Also, the best time to water is in the morning. The planter works best when the soil quality is poor.
Aloe Plants
With aloe, you should avoid this self-watering mechanism. The last thing you want to do to aloe house plants gives it too much water.
Jade Plants
A jade plant is an indoor succulent, which means they don’t need much water. A self-watering planter would not be suitable as it would give the jade too much water.
How Do Indoor Self-Watering Planters Work?
 How Do Indoor Self-Watering Planters Work?” width=”800″ height=”600″>
A container that bills itself as “self-watering” doesn’t water itself. If you live in a hot weather climate, you’ll want to be careful that the water doesn’t evaporate after you’ve made your new indoor self-watering planters.
The system that comes with a water reservoir located at the bottom of the container. By means of a soil “foot” or a fabric “wick” connected to the area where the plant is.
Plants grown in a soil foot system will send roots to the foot and take up as much water as they require. The water is moved through the wick and into the soil of the main pot with the wick system, a capillary action system. Either way, they will have access to water as long as there is water in the reservoir. The system allows you to water less while keeping their health.
How Do I Make Planters Self-Water?
Here’s a cool trick to make a self-watering system with an empty soda bottle. It’s suited for a larger planter or container. You can also use it on a sensitive plant in the ground that needs regular water.
- Fill a two-liter soda bottle with water and rinse it.
- Remove the neck so that the top aperture can be filled with a hose after it has been cut.
- Cut the bottom of the bottle and turn it upside down. Next, the cut-open bottom has now been transformed into a “neck.”
- Small holes should be punched or sliced randomly across the bottle’s body.
- Make a hole in the soil that allows you to put the bottle in the center of the planter or right close to the root system of a plant that is already planted in the ground and fill it with soil.
- Fill the bottle with soil to the open neck. Fill the bottle with water all the way up to the top.
This homemade system works by allowing water to seep through the perforations in the bottle and into the soil. Because it is buried it will help prevent evaporation.
Can You Put Rocks At The Bottom Of A Self-Watering Planter?
There are some who think gravel is required in a self-watering planter, while others claim it’s a bad idea. Some also believe that not only are rocks not required at the bottom, but they interfere with the system’s function. Gravel should not be used to line the bottom.
The mechanism allows the water to be delivered to plant roots when it is required, rather than when the pot is dry. This occurs because of capillary action. Those who think that rock layers on top of fabric wicks should know they will take up space in the reservoir. This either limits the water volume or reduces the amount of time it can go without water.
Best Plants For Self-Watering Pots
The pots are ideal for anyone who has a habit of forgetting to water their indoor greenery. However, they aren’t just for those who forget about their gardens. They are ideal for greenery that dislikes being watered by hand, such as succulents and cacti.
Here are five species you can grow in self-watering pots.
Pothos Or Devil’s Ivy

A Pothos plant flourishes in a self-watering pot for several reasons. Root rot can be avoided, a condition this plant suffers from owing to a lack of water or excessive irrigation.
Too much water can result in fungal diseases and drooping. It’s preferable to use a self-watering pot. Allow them to dry before replenishing the reservoir.
People will top-dress their Pothos with new dirt in the visible gaps.
Ferns

Ferns thrive when they are provided with moisture and humidity, and planted in peaty soil. Using water at room temperature will help to ensure their health.
Ferns die from a lack of moisture and too much water. When ferns do not receive enough water, their leaves turn yellow and they become dry. Overwatering can result in the rotting of plant roots and fading foliage.
A fern’s moisture requirements should be monitored on a regular basis. Avoid adding water from the top after they’ve been planted in a pot.
Cherry Tomatoes

Large containers are just the thing for cherry tomatoes. They allow space to absorb water. The plants demand large more water to provide a nice harvest.
Little water will cause end rot and split produce. Overwatering has a bad effect on the plant’s performance. To remain healthy, give it consistent water and nutrients. You want to prevent overwatering. Although the soil must be moist, this does not imply it must be humid.
The system will ensure they receive the right amount of water. We can also use the system to water automatically.
Umbrella Palm

Umbrella palms require more water. In addition, it is a semi-aquatic plant. If we plant an umbrella palm in a self-watering pot, it will thrive.
Because it thrives in water, we must fill the reservoir to its capacity and replace it as needed. It is possible to refresh the plant by checking on it every now and then and supplying it with water.
When dealing with an umbrella palm, we must make certain that the roots are kept moist and moist. If the plant’s roots become dry, it will have a negative impact. It causes dehydration in this particular type of plant resulting in brown stains on the tips of their leaf tips and other symptoms.
Basil

Basil, which is common in the food world, requires sunlight and mild temperatures to thrive. When the weather is hot and dry, it will grow well. When it gets chilly, the plant may not withstand the weather.
We can avoid such issues by providing the plant with an atmosphere conducive to growth. Growing a basil plant indoors, either under a fluorescent lamp or placed on a windowsill can help it grow faster.
A self-watering pot makes it easier when kept inside gives them the amount of water they need to drink.
Pros And Cons Self-Watering Planters

Now that we know more about these special pots, let’s examine the benefits of choosing this type of self-irrigation system:
- Convenience is the real benefit here as a self-watering pot helps you relax.
- The system is designed to save water and distribute it. They will save time and eliminate the need for heavy water.
- Your greenery will be watered while you’re away.
A few drawbacks:
- Since they can’t detect humidity, when it rains, overwatering is a problem.
- With thirsty plants, this system won’t work.
DIY Self-Watering Herb Planter Box

Making your own self watering herb planter box is very easy, so here is a short tutorial that will guide you through the process so you can see for yourself how easy and cost-effective this is.
What you’ll need:
- A plastic container
- A wooden crate that fits the container
- Some gravel
- A PVC pipe
- Geotextile fabric
- Potting mix
- The herbs of your choice
- Handsaw
- Drill
- A wine cork
Step One
Pour a layer of gravel into the plastic container to create a layer that’s about two inches deep.
Step Two
Dig a few holes into the gravel and push in some small pots.
Step Three
Using a handsaw, cut a piece of the PVC pipe that’s the same height as the box. Insert this vertically into one of the corners of the plastic container.
Step Four
Drill a hole on the side of the box, just above the gravel layer
Step Five
Cut a piece of geo-textile fabric and place it on the top of the gravel.
Step Six
Put the plastic container into the crate and add soil on top of the geo-textile fabric, but make sure to leave room at the top.
Step Seven
Put the plants into position and add some extra soil, tapping in gently so that the roots of the herbs are covered.
Step Eight
Insert a sharpened paddle pop into a wine cork and place it inside the PVC tube that’s sticking out of the soil
Step Nine
Pour water inside the pipe and when you notice the cork floating about two inches from the top, it means you’ve added enough water.
Quick and Simple DIY Self-Watering Planters
1. DIY Self-Watering Planter Using a Recycled Bottle
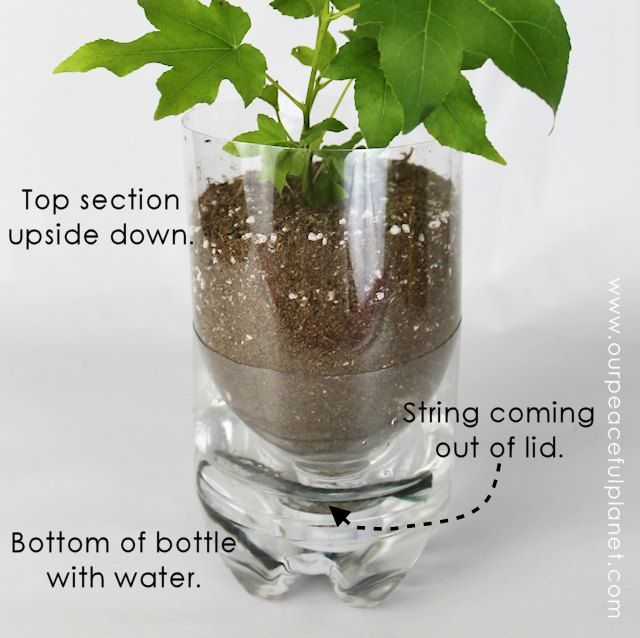
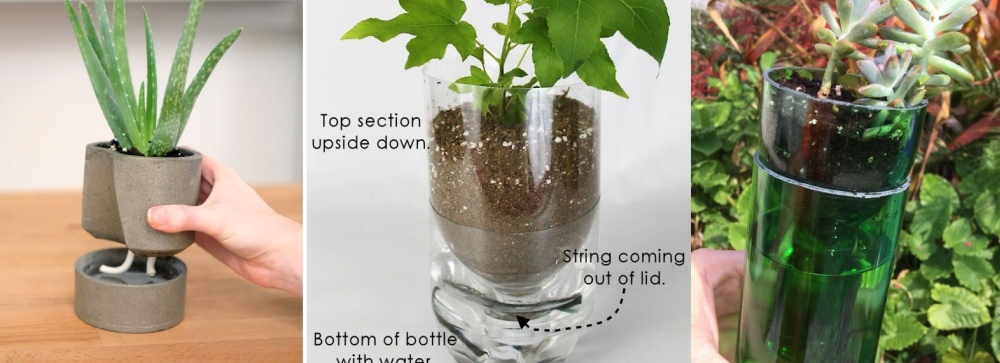
A lot of the DIY self-watering planters on our list are made from recycled bottles. The tutorial from craftyourhappiness shows how you can make such a planter out of nothing but a plastic bottle and a piece of string. Cut the bottle into two sections, make a hole in the cap and run the string through, put a few stones and soil into the top section, add the plant and then place this upside down into the bottom half of the bottle which is filled with water.
Related: Click and Grow Smart Herb Garden Review – The Best Self Watering Pots
2. Self-Watering Concrete Planter

Check out how cute this self-watering planter is. It has two parts: a water reservoir at the bottom and the actual planter at the top. there’s a hole in the bottom of the planter with a wick coming out of it. The (or string) absorbs water and lets it seep into the soil, ensuring a suitable environment for the plant to grow in. You can make these with molds and concrete mix. Find all the details on instructables.
3. Self-Watering Downspout Planter

DIY self-watering plant pots have the same structure. The pot features a reservoir filled with water and the actual planter which sits on top and receives water from the reservoir through small holes or a wick. The self-watering downspout planter featured on instructables is no different. With this planter, remember to fill the reservoir on occasion.
4. Glass Bottle Self-Watering Planter

Bottles are easier to cut, but if you want your self-watering planter to be a bit more sturdy you might want to use a glass bottle instead. You’ll need a bottle cutter for that. The project is easy even with this extra step. What’s nice is you could use a green-tinted wine bottle that would match the plants and would be heavy and sturdy enough to last for a long time.
5. Bottle Gardens For Your Herb Garden

DIY containers are good for herb gardens. They are small enough to be kept on the windowsill and large enough for the plants to have enough room for growth. The ones suggested on designsponge are made out of recycled bottles that could be beer or wine bottle tops. As you can see, the two pieces don’t have matching colors and that’s a pretty cool detail.
6. Sports Top Water Bottle Self-Watering Planter
To make it even easier to craft a self-watering planter out of a bottle, choose a bottle that has a sports top. This way you won’t need to add the string and to make a hole in the map. In addition to the bottle, you’ll also need some aquarium gravel, soil, a plant, scissors (or a small utility knife), and some dried moss. Follow the instructions on thechillydog.
7. Large DIY Self-Watering Planter

After you’ve seen the ideas we’ve gathered so far, you might be wondering if there’s any possibility that you could make a large plant pot, like the one have. Check out bucolicbushwick to find out how you can convert a standard one into a self-watering one.
8. Homemade Self-Watering Planter

If you like the idea of a large self-watering planter or one that has a big reservoir for those times when you need to take long trips, you should have a look at the tutorial offered on frugalupstate. It shows you how to craft a self-watering planter that suits these criteria. The project is fairly simple and budget-friendly.
9. Upside-Down Hanging Self-Watering Earth-Filled Box

There’s more than one way to connect a pot to a water reservoir. The idea with the bottle planter that has a hole in the cap and a wick is one of the easiest to achieve, but there’s another strategy that you might want to try. This idea comes from instructables. The planters are hanging upside down and that’s cool even without the watering system.
10. DIY Self Watering Planter Box

Another tutorial showing you how to build one can be found on thehandygardener. The supplies needed include a foam box with no holes and with a lid, a PVC pipe, a saw (or something to cut the pipe with), scissors, waterproof tape, and a stick. Curious what the stick is for? It serves as a gauge that lets you know whether your box needs water or not.
11. DIY Self-Watering Container: Water Cooler Bottle

The idea of up-cycling water bottles is great because you can make them of all shapes and sizes, depending on the size and shape of the bottle. If you need a large one then use a water cooler bottle. It should offer a big water reservoir that will take care of your plants. The tutorial on bucolicbushwick suggests using a tomato cage as a support structure if needed.
Related: AeroGarden – The Best And Easy Way To Grow Plants Indoor
12. A Self-Watering Planter for Under $10
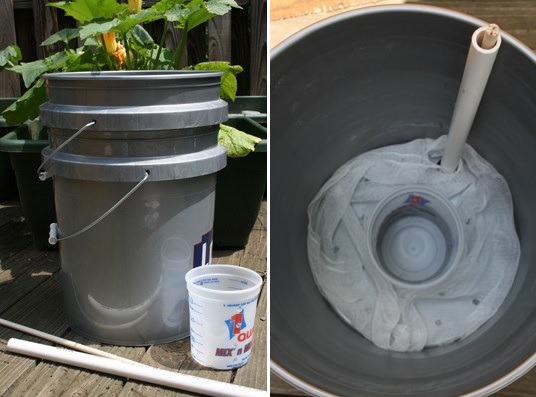
Speaking of large pots, another idea is to use buckets instead of big bottles. According to the tutorial on reallifeathome you can make one using two paint buckets, a paint mixing container, PVC pipe, dowel, and a drill. You’ll need coffee filters or a cheesecloth to cover the holes at the bottom of the bucket so the soil doesn’t block them.
13. Customize Your Self-Watering Planter

As you’ve probably figured out by now, you can probably use any type of pot or container to build. It’s a matter of adjusting the design to the supplies and tools that you have. Check out littlevictorian to find out how this whole process goes. It’s easy, cheap and anyone can do it. Also, there’s a lot of room for customization.
14. Self-Watering Container Garden
It’s possible to build this from almost anything. I think we’ve proven this with the planters made of bottles, but check out this project from verticalveg. They are made out of wood boxes, plastic sheets, pipes, and containers.
15. Self-Watering Planters for Tomatoes

Thanks to designs like this one you can grow vegetables without a garden. You can make one like this for less than $10. All you will need is a towel, two containers, and two sponges. You can find all the details plus instructions and tips in this Youtube video tutorial.
16. DIY Mini Self-Watering Wicking Garden

This is a great option for a green thumb who is short on space, and this wicking bed container garden is simple enough for anyone to create. Follow this tutorial on YouTube for more details. It will save you water and provide moisture, and is easy to build.
You could even get your kids involved in this project, and it’s ideal for anyone who lives in an apartment or who is an urban gardener. Your new garden setup should last for a few years, and you’ll just have to replace the fabric on the bottom from time to time.
17. Make A Self-Watering Container With Buckets

You’ll just need two buckets and a Styrofoam cup to form the base of this container. You can easily find buckets for this project from crestonesolarschool at your local grocery store. Try to get two different sizes and depths to be able to make this one.
The shorter one will hold the plant, and then the larger one is used for the water reserve. The Styrofoam cup will need to be large if you have a deep water reservoir, but it can be small if it’s shallow. You can also opt for an empty bottle if this is easier to find. This is a fun and easy project to create, especially in comparison to other options, and it’s a great choice for anyone going away for an extended period of time to keep your plants healthy.
18. Self-Watering Garden Using Your Air Conditioner

For an eco-friendly option that uses your air conditioner’s recycled water, check out this garden from instructables. It will save on your water bill while looking after your garden, and you won’t have to be involved in the process at all once it’s set up. It will save you precious time and effort in the garden, and your vegetables taste and look better since no chlorine is used.
19. One Cut Soda Bottle Self-Watering Planter
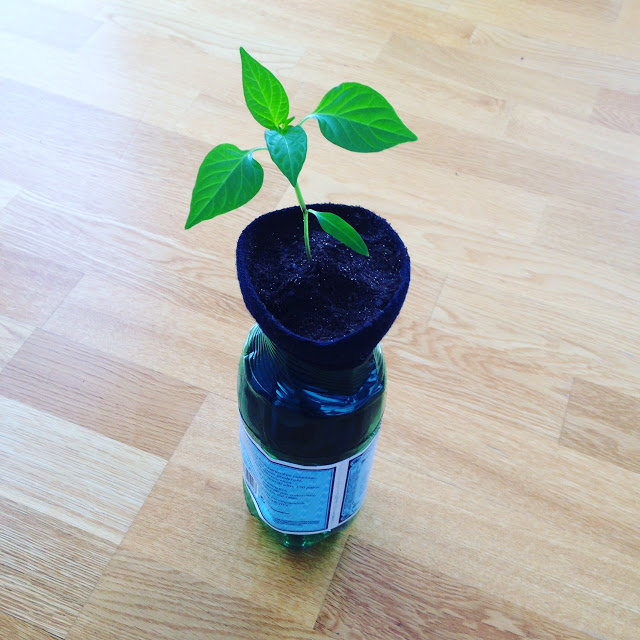
For this simple DIY project, you’ll just need a 2-liter bottle and an old sock that’s ready to go in the bin. It requires just one cut of your bottle, and then you’ll push the end of the sock through the bottleneck. The elastic band in your sock will help to keep it in place with no issues. It’s perfect for indoor use, as you’ll fill the sock with dirt and add a plant of your choice as shown in these instructions from planteatrepeat.
20. Self-Watering Planter With Any Container

Use a container of your choice to create this one from thekitchengarten. Options include a Rubbermaid tub or a decorative container if you want to make this a focal point. You could use any large container, even one not designed for plants. It’s also ideal for salad leaves. You can watch them bloom within weeks.
Self-Watering Planters Frequently Asked Questions
How Do Self-Watering Hanging Baskets Work?
Self-watering hanging baskets are like others. You’ll need a growing bed, potting soil, water reservoir, and a wicking system that puts dirt in contact with water. The baskets use capillary action or “wicking.” When the roots absorb water, the soil wicks up to maintain moisture.
Do Self-Watering Planters Attract Mosquitoes?
Yes, they do. They’re the ideal breeding grounds for mosquitoes. Because of their constant moist conditions, it’s easier for them to lay eggs. To prevent mosquitoes from invading, flush the water out every few days.
What Happens When The Reservoir Dries Out?
If you don’t keep water in the plant pot reservoir it will cause the wicking system to dry out and it won’t work when you refill the reservoir. If you do happen to allow the reservoir to dry out, you will need to water it from the top, soaking the dirt with the wicking system at the bottom of the plant pot. This will get the moisture needed to restart the capillary action.
Self-Watering Planters Conclusion
They are a great option to keep your greenery healthy for, especially if you are going away for a week or so. You’ll want to ensure you use them with the specified types of plants for these containers, which are vegetables and tropical plants.
The great thing about all of these projects is that they encourage you to reuse household items and containers, and minimize waste. It’s an excellent way to bring new life into an item that may otherwise be heading for the trash. With minimal time and effort, you will have added a handy tool to your gardening supplies that will save you water and hassle in the long run.
The post 20 DIY Self-Watering Planters That Are Easy To Craft appeared first on Home Decorating Trends - Homedit.
0 Commentaires